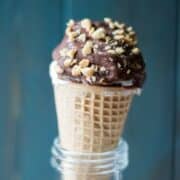
Homemade Drumstick Ice Cream Cones
A homemade version of a classic childhood treat, these ice cream cones are made with ice cream and then dipped in chocolate and finished with crushed peanuts.
Servings: 6
Calories: 257kcal
Ingredients
- 6 ice cream cones
- 48 ounces ice cream any variety
- 16 ounces chopped semi-sweet chocolate or chocolate chips
- ½ cup chopped peanuts optional
Instructions
- Line a cookie sheet with parchment or wax paper and be sure there is room to fit it in the freezer.
- Place one chocolate chip or morsel into the bottom of each cone.
- Stuff each ice cream cone with 8 ounces of ice cream, finishing with a perfect half-sphere on top of each cone (use your hands, if needed.) Place the ice cream cones on the prepared cookie sheet and freeze until solid, about an hour.
- Heat remaining chocolate chips in a microwave-safe bowl on medium-high for about 1 minute. Remove from the microwave and stir. Repeat heating at intervals of 30 seconds, stirring in between, until the chocolate is completely melted and has a smooth consistency.
- Remove the ice cream cones from the freezer and working quickly, spoon the melted chocolate over the ice cream. Sprinkle with chopped peanuts.
- Place back on lined sheet and freeze for another 30 minutes.
- Serve after chocolate has set OR place prepared drumstick cones into an airtight freezer-safe container for up to 1 week.
Video
Notes
Ice Cream Cones: Use any variety of ice cream cones you like--gluten-free, sugar cones, cake cones, waffles cones, etc.
Ice Cream Options: While vanilla ice cream is traditional, these cones are delicious with ANY variety of ice cream. Select dairy-free or vegan if needed as well.
Dairy-Free Drumstick Ice Cream Cones: Use dairy-free chocolate chips AND dairy-free ice cream.
Topping Options: The nuts are completely optional and can be left off. Sprinkles are also a fun addition to the cones as well. If using sprinkles, sprinkle on the cones before the chocolate has set up.
You can add ½ tablespoon of coconut oil to your chocolate before you melt the chocolate. This makes your chocolate a lot thinner and will cause the chocolate to set up immediately on your ice cream (sort of like Magic Shell.)
Nutrition
Calories: 257kcal | Carbohydrates: 42g | Protein: 11g | Fat: 16g | Saturated Fat: 5g | Cholesterol: 27mg | Sodium: 87mg | Potassium: 678mg | Fiber: 4g | Sugar: 39g | Vitamin A: 945IU | Vitamin C: 1.6mg | Calcium: 259mg | Iron: 3.2mg