This post may contain affiliate links. Please see our disclosure policy.

With layers of rich dark chocolate, sweet white chocolate, and crushed candy canes, this Homemade Peppermint Bark tastes just as good as store-bought and easier to make than you may think!
If you can melt chocolate and crush a candy cane, you can make Peppermint Bark. This copycat recipe only uses 4 ingredients, comes together in minutes, and is a fraction of the cost of store-bought tins. Perfect for gifting, but trust me, you will want to save some of this easy Christmas treat for yourself.

Kristen's Keys for Homemade Peppermint Bark
This recipe for peppermint bark is incredibly easy. Just like my recipes for peanut butter cups and chocolate bark, there is no candy thermometer or tempering headaches, just a few small technique things to pay attention to so the layers set beautifully.
- Use real white chocolate. Many white chocolate chips use palm or vegetable oils and won't bond or set the same way. Choose one with actual cocoa butter, like Guittard.
- Dark chocolate is my personal preference. While semi-sweet chocolate works as well, dark chocolate provides a nice contrast to the sweet white chocolate. Williams Sonoma Peppermint Bark is also made with a layer of dark chocolate.
- Use peppermint extract, not peppermint oil. And a little goes a LONG way!
- Line your pan with parchment. This makes lifting and cutting mess-free.
- Crush candy canes to a mix of small and slightly larger pieces. Very fine dust can sink or melt into the white chocolate; chunks give texture and look nicer on top.
How to Make Peppermint Bark at Home
Again, let me stress that it is really easy to make a copycat version of peppermint bark. Think of this section as me there with you, helping achieve success.
Step One: Prep Smart
Make the process seamless by prepping your pan and peppermint candies before melting any chocolate.
- Line a rimmed baking sheet with parchment paper or a silicone mat and set aside.
- Place a few candy canes or peppermint candies into a storage bag and crush with the bottom of a heavy cup or a rolling pin and set aside for the white chocolate layer.
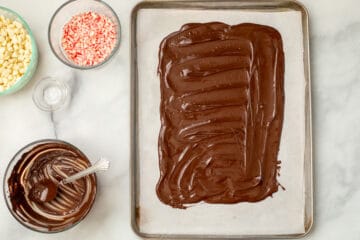
Step Two: Prepare Dark Chocolate Layer
To give your peppermint bark it's classic layers, start this recipe with preparing the layer of dark chocolate.
- Place the dark chocolate in medium heat-safe bowl and microwave in 30-second intervals, stirring between each interval until smooth.
- Pour the melted chocolate over the prepared pan and use an offset spatula or back of a spoon to spread into a rectangular shape with about ¼-inch thickness.
- Let this sit at room temperature for 10-15 minutes to allow the chocolate to harden.
👉🏻Want to use a double boiler to melt the chocolate? Fill the bottom of a large pot with about 3 inches of water and bring it to a simmer over medium heat. Reduce heat to low, then place a large heat-safe bowl on top of the pot. Add the chocolate and stir occasionally until the chocolate has melted.

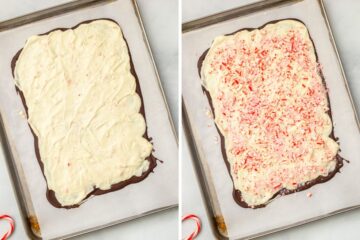
Step Three: Prepare White Chocolate Layer
To achieve the classic texture and flavor store-bought peppermint bark, you will want to stir some of the crushed candies into the melted white chocolate before adding to the dark chocolate layer.
- Place the white chocolate into a clean medium heat-safe bowl and microwave in 30-second intervals, stirring between each interval until smooth.
- Add the peppermint extract and 2 tablespoons of the crushed candy canes and mix to combine.
- Pour this mixture over the set dark chocolate and use a clean spoon or offset spatula and gently spread to cover.
- Immediately sprinkle the remaining candy canes over the white chocolate.

Step Four: Let Harden and Cut
Allow the peppermint bark to fully harden before breaking or cutting into pieces and storing (or eating).
- Let the bark sit at room temperature for an hour or so unit completely hardened. You can speed up the process by popping the tray into the fridge. or pop it in the fridge to speed up the process.
- Lift the parchment from the pan and break the bark into pieces or use a sharp knife to cut neat rectangles.
👉🏻Chilled Bark? If you popped the bark into the fridge to set up, let it sit 5 minutes at room temperature before breaking or cutting so it doesn't shatter.

Recipe Modification & Storage Tips
- Storage: Store the peppermint bark in an airtight container for up to 2 weeks in a cool, dark pantry. If your house runs warm, keep it in the refrigerator to prevent softening.
- No Peppermint Extract? Simply omit it! The bark will still have a minty flavor due to the candy canes, but won't be quite as pungent.
- Vary the Chocolate: If you don't care for white chocolate or maybe you would rather not use dark chocolate, simply use only one variety of chocolate and double the amount used.
- Think Beyond Gifting! Add to a mug of hot chocolate, peppermint mocha, or your tray of Christmas Cookies with a few pieces of this irresistible bark.
More Festive Holiday Recipes
Homemade Peppermint Bark

Ingredients
- 8 candy canes , about ½ cup crushed peppermint candies
- 12 oz semisweet chocolate, chopped
- 16 oz white chocolate, chopped
- ½ teaspoon peppermint extract
Instructions
- Line a large baking sheet with parchment paper or a silicone mat.
- Unwrap 8 candy canes , place them into a heavy-duty sandwich bag, and crush them using a rolling pin or heavy cup. Remove 2 tablespoons of the candy canes and set aside.

- Place the 12 oz semisweet chocolate in a medium heat-safe bowl and microwave in 30-second intervals, stirring between each interval, until melted. Stir until smooth.
- Pour the chocolate out over the parchment paper, and using an offset spatula, spread the melted chocolate into a roughly 9″x 13″ rectangle. Place the chocolate in the refrigerator to set for 15-20 minutes.
- Once the dark chocolate layer has set, place 16 oz white chocolate into a clean heat-safe medium bowl and microwave in 30-second intervals, stirring between each interval, until melted. Stir until smooth. Add ½ teaspoon peppermint extract and reserved 2 tablespoons of crushed candy canes and stir quickly to just incorporate.
- Pour the white chocolate over the semisweet chocolate layer and use an offset spatula to spread evenly to cover the chocolate layer with the white chocolate. Working quickly, sprinkle the remaining crushed candy canes evenly over the white chocolate. Use your hands to gently push the candy canes into the white chocolate to adhere.
- Allow this mixture to fully harden at room temperature or in the refrigerator. It will take 30-60 minutes.
- Once fully hardened, remove the bark from the parchment paper or silicone mat and break or cut it into pieces.


Equipment
Notes
Nutrition
Nutrition information is automatically calculated, so should only be used as an approximation.


When do you add the crushed candy canes?
Hi Lee! You add 2 tablespoons of crushed candy canes to the melted white chocolate, pour over the dark chocolate, then add the remaining candy canes over the white chocolate before it sets.
Turned out amazing! My daughter and I had so much fun making this together.
I love hearing that you enjoyed the bark & you made memories together in the process!
This recipe was so delicious and easier than I thought it would be to make!
Wonderful! So happy to hear you enjoyed these Snowball Cookies, Sarah!
I don't think I can make this again, it's too hard to resist! Haha. I'll just have to make sure and share it before I consume the whole batch. 🙂
Ha! I totally get it, Kara! I have to stop myself from eating it when I break it apart!