This post may contain affiliate links. Please see our disclosure policy.
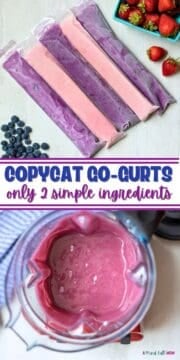
Skip the store-bought yogurt tubes and make your own! Homemade Gogurt is one of the easiest, healthiest snacks you can prepare and only takes two simple ingredients.

DIY Gogurt Recipe

My kids love taking a Go-Gurt © in their school lunches.
But instead of opting for store-bought yogurt tubes, which are often filled with excess sugar, food coloring, and are quite pricey, I opt to make my own yogurt tubes.
Made simply with plain yogurt and fresh fruit, these homemade yogurt tubes are a cheaper, better-for-you, and better tasting version of a Go-Gurt! They are super easy to make, freeze well, and loved by kids-big and small!😉
Happy Cooking! xo Kristen
Notes on Ingredients & Equipment
- Yogurt: I prefer to use plain store-bought or homemade Greek yogurt, as it is lower in sugar than flavored yogurt and super thick, which makes it less messy-especially important for little ones! You can opt to use dairy-free coconut milk yogurt or your favorite almond milk yogurt if you need the yogurt tubes to be dairy-free.
- Fruit: The options for fruit are endless, but I recommend berries for the most vibrant color and flavor. Peaches, cherries, and avocado are great options as well. Anything that is really watery, like melon, or fibrous, like apples or pineapple, I recommend avoiding when making yogurt tubes.
- Tubes or Pouches: You can opt to use reusable pouches, reusable tubes, or disposable popsicle bags for your homemade yogurt tubes. Just keep in mind that while reusable tubes or pouches are great for less waste, they can be hard to clean-especially if they have been sitting in a lunchbox all afternoon!
How to Make Yogurt Tubes
The following tips are provided to help you achieve perfect results. You will find the ingredient quantities and detailed instructions in the recipe card at the bottom of this post.
- Place fruit and yogurt into a blender or food processor and blend until smooth.

- Using a small funnel, carefully fill yogurt tubes or pouches with yogurt mixture, leaving at least ½-inch room at top of each tube for expansion. Seal well.
- Store in the refrigerator for up to 4 days or in the freezer for up to 3 months.

Kristen's Tip
Tip for Packing in Lunches
If you are planning to pack yogurt tubes in a lunch box, I highly recommend freezing them first. Simply pop one in a lunch box in the morning with an ice pack and by lunch, they are defrosted and ready to eat. Frozen GoGurts are also a refreshing treat on a hot summer afternoon!
Recipe FAQs
Yes! Just keep in mind that it will add to the overall sugar content of your homemade yogurt tubes.
No. Regular yogurt works as well. Greek yogurt is just thicker and a bit less messy to work with.
Yes! Pumpkin puree, fresh spinach, sweet potato puree, or carrot puree all work really well in yogurt pouches. You can mix the vegetables with fruits or simply use vegetables.
Yes, but be sure to defrost the fruit BEFORE making yogurt tubes, so that the mixture blends up nice and creamy.
More DIY Kid-Friendly Treats
Did you make this recipe?
If you enjoyed this recipe, please leave a comment with a 5-star review at the bottom of the post. Thank you!
Yogurt Tubes

Instructions
- Place 2 cups plain yogurt into the blender. Add in 1 cup fruit of your choice. And blend until well combined.
- Using a small funnel, carefully fill yogurt tubes with yogurt mixture, leaving at least ½-inch room at top of each tube for expansion. Seal well.
- Store in the freezer for 3 months or in the refrigerator for up to 5 days.
- Place a frozen yogurt tube in school lunches in the morning with an ice pack, and my lunch the tube should be defrosted.
Equipment
Notes
Nutrition
Nutrition information is automatically calculated, so should only be used as an approximation.
This recipe was originally published in 2015 but has been updated in 2025.


This recipe is genius! And way cheaper than getting the premade ones from the store!
WAY cheaper!! Thank you!
I love that they have created a mold for everything! ????
This looks perfect for the kiddos to help create!
Thanks
Michelle
I know--there really is a product out there for everything now. I hope your kids enjoy!
I love that these don't have sugar. sometimes I like the kids' input when shopping but not usually!
I am completely with you Shelley!
Brilliant!! And your video is awesome and makes me want to whip up a batch right now!!
I hope you do Katie!! And thank you for your kind words 🙂
What a great idea! So much better than the store bought ones with lots of additives!
My thoughts exactly Jessica!
These look so easy and the kids will love them!
Easy for sure Marye!
My kids would love these!
I bet they would Rachel!