Feeling overwhelmed by your new Instant Pot? This beginner's Instant Pot guide will walk you through the essentials of using an electric pressure cooker and will leave you feeling confident and ready to conquer using your Instant Pot.
Once you master the basics of using the Instant Pot, check out Instant Pot Recipes. And don't miss signing up for my top Instant Pot Secrets!
If you have recently been gifted or purchased an Instant Pot, chances are you are either feeling excited or completely overwhelmed.
One look at the manual that came with the Instant Pot and you are feeling even more confused than when you first opened the box. It is lacking in information!
I have helped millions of people put aside their fears and tackle cooking in their Instant Pot and I want to help you!
How to Use an Instant Pot
Using an Instant Pot is not hard, but there is a bit of a learning curve.
First, I will walk you through the basic Instant Pot parts and jargon. Then I will show you how to set cooking time and how to release pressure. After that, you will be well on your way to becoming an Instant Pot Master!
And if you learn better through video, be sure to check out my YouTube Video!
The Parts of an Instant Pot
Before we talk about HOW an Instant Pot works, let's break down the standard pieces and parts of the Instant Pot. That way you will know which piece is which.
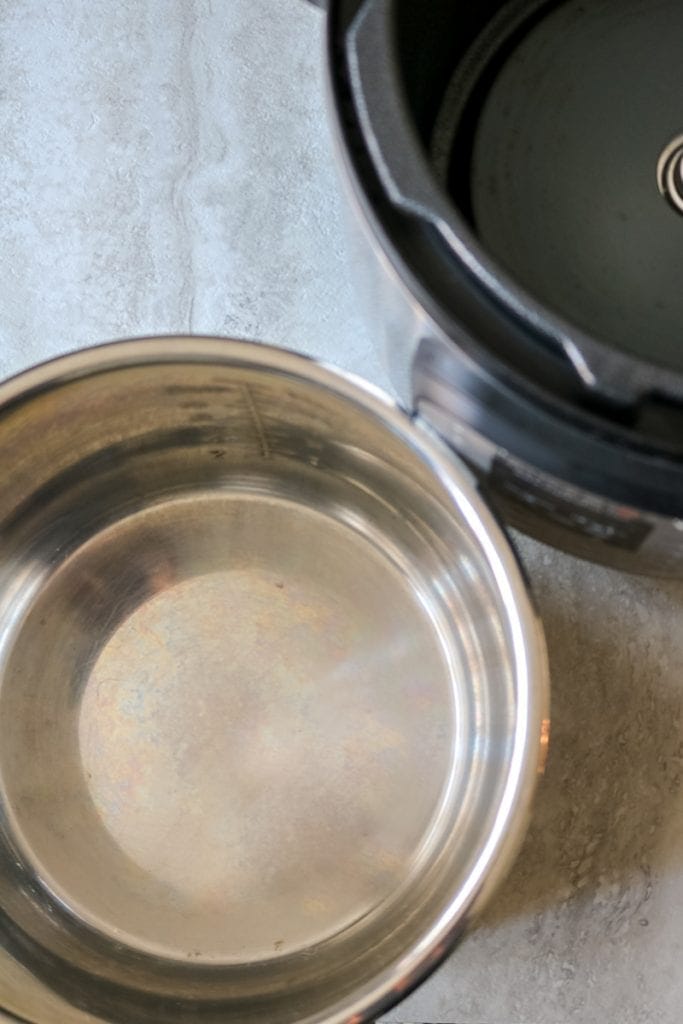
Inner Pot: The stainless steel pot that fits inside the Instant Pot, is called the inner pot. It is removable for washing. And essential for cooking--do NOT operate your Instant Pot without the inner pot. Some people prefer to have two inner pots or a ceramic insert. Frankly, I think one stainless steel inner pot is sufficient unless you plan to make yogurt frequently. Then an extra inner pot helps out tremendously.
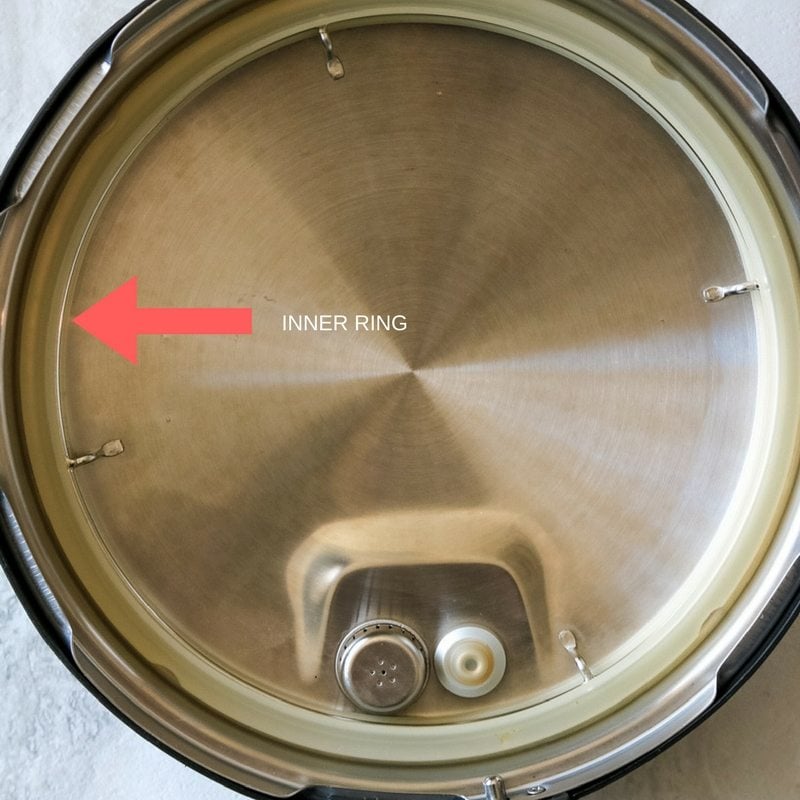
Inner Ring. This is the silicone ring that fits on the lid of the Instant Pot and helps to seal in the pressure. It is removable and should be removed and washed thoroughly any time it gets dirty. I like to have a set of inner rings and use one for savory and one for sweet dishes, that way my cheesecake won't taste like chili!
The inner ring can cause the MOST issues when it comes to pressure cooking. You need to be sure it is always tightly inserted on the lid. If not, pressure will not be reached properly and you may experience a burn warning. If you notice any tears on your inner ring, or it becomes loose over time, be sure to immediately replace it.
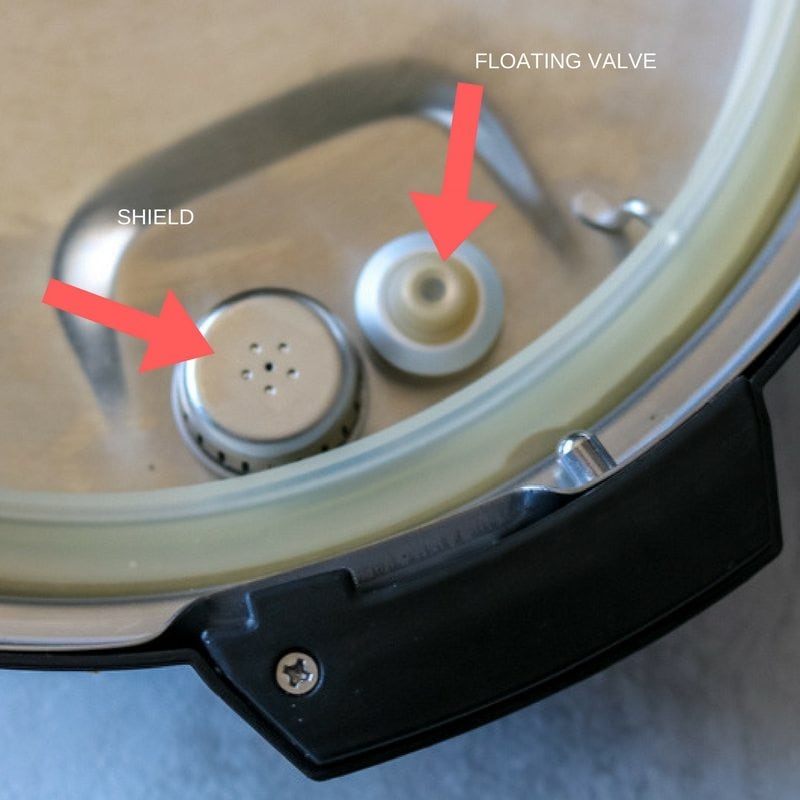
Floating Valve and Shield. The shield prevents food from getting trapped in the pressure release valve. The float valve is designed to be pushed up once there is sufficient pressure inside the cooker. Once pushed up, the silicone band seals the instant pot and the pin of the float valve serves as a lock, preventing the lid from being opened before the pressure is released. The float valve will float back down as pressure is released, unlocking the lid from the Instant Pot. (And in case you misplace your Floating Valve, you can get an extra to fit your model on this here.)
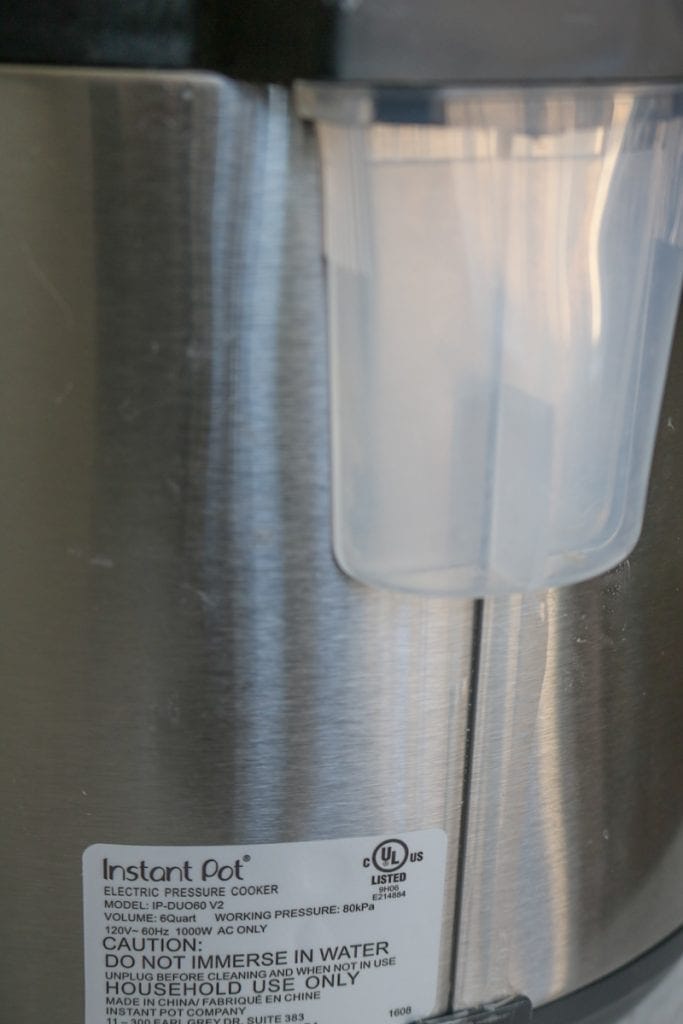
Condensation Cup. This plastic cup collects any moisture or condensation that leaks out during the cooking process. It also collects moisture that may drip down from the lid once you open the Instant Pot. Be sure to check it every once in a while to remove it and clean it as needed.
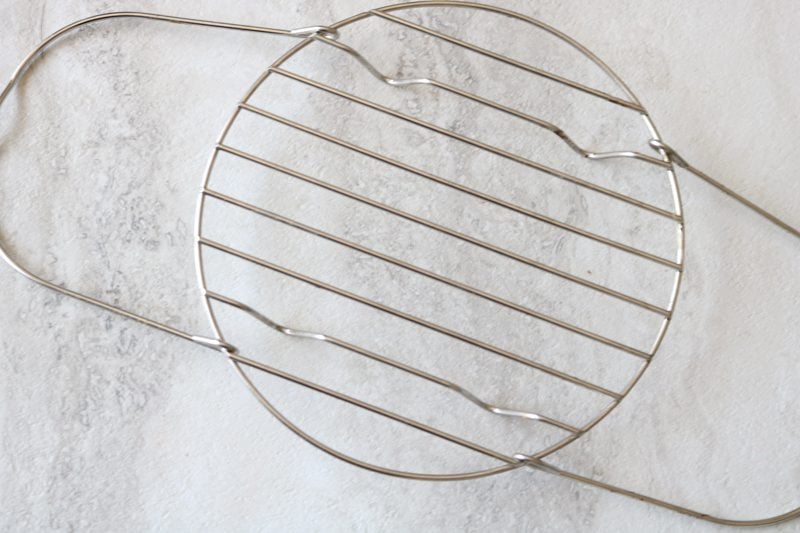
Stainless Steel Trivet. Most Instant Pot models will come with a metal rack, often referred to as a trivet or you can purchase it on Amazon. This is used often for cooking things you do not want to be submerged in liquid, such as Instant Pot Baked Potatoes and Instant Pot Baked Sweet Potatoes It is also used for pot-in-pot cooking.
Cook This First
Now that you know the parts of your Instant Pot, it is time to use it! I always suggest starting by doing a water test. This is a way to get comfortable using the Instant Pot without wasting any actual food. It is quick and easy to do and will have you feeling confident to cook any Instant Pot recipe.
Important Things to Remember When Using an Instant Pot
- Be sure your inner pot is secured into the base of your inner pot.
- Always use thin, cold, liquid (water, broth, beer, juice, etc) to achieve and maintain pressure.
- 3-Quart Instant Pot: ½ cup thin liquid
- 6-Quart Instant Pot: 1 cup thin liquid
- 8-Quart Instant Pot: 1-½ cups thin liquid
- 10-Quart Instant Pot: 2 cups thin liquid
- Don't overfill the Instant Pot. It is best to never fill the Instant Pot more than ⅔ of the way full when pressure cooking and no more than ½ full for starchy things like rice or beans.
- After using the saute function, be sure to scrape up any browned bits on the bottom of the inner pot to prevent a burn notice.
- Check to be sure that the sealing ring is attached securely to the lid and place the lid on the inner pot.
- Be sure the vent knob is sealed and or the lid is locked.
- Set the cooking time using the manual or pressure cook button to control the time yourself, don't rely on the other functions, many of the buttons on the Instant Pot are useless.
- Cooking Time is NOT the amount of time the recipe takes. Instead, you need to account for the time it takes for the Instant Pot to come to pressure, plus the cooking time, plus the time for the pressure to release. Depending on how full your Instant Pot is, this could add 40 minutes to your cooking time.
- Once the cooking time has started, it will count backward.
- After the cooking time has elapsed the Instant Pot will default to holding the food warm. It will count upward showing how long since the cooking time has elapsed.
- Based on the recipe's instructions, allow the pressure to release naturally or do a quick release of pressure.
- Cooking at high altitude? Use my guide for Instant Pot High Altitude Cooking.
- Want to know how to convert your favorite recipes to Instant Pot recipes? I have worked at length to create a guide that will help you convert your favorite recipes into Instant Pot recipes.
- Have trouble with your Instant Pot Sealing? Check out Reasons Your Instant Pot May Not Be Sealing.
How to Release Pressure Safely on an Instant Pot
While electric pressure cookers are deemed overall much safer to use than stovetop pressure cookers, as the lid will remained locked until the pressure has been released.
But when it comes to releasing pressure you need to know if you should do a natural pressure release or a quick release of pressure.
- Natural Pressure Release (or NPR) is when the pressure is slowly released on its own. This is when you leave your Instant Pot alone and allow the float valve to float down on its own. It is best to use a natural pressure release for meats to keep them tender, recipes with high starch (like rice or grains), and recipes with a high volume of liquid.
- Quick Release (or QR) is when you manually turn the valve to "Vent" and allow the pressure that has been built up to release rapidly. This method is used for things like seafood or delicate vegetables. To do a quick release of pressure, use the long handle of a wooden spoon to manually turn the valve from seal to venting AND STAND BACK to prevent yourself from getting burned by the steam.
Must-Have Instant Pot Accessories
I am often asked what are my favorite Instant Pot Accessories, I try to keep things super simple, but these are my favorite accessories and why you may need them.
- 7 inch springform pan: Great for Instant Pot Cheesecake or Instant Pot Lasagna.
- Clear Lid: this is great for using your Instant Pot as a slow cooker or for making yogurt.
- Cake Pan: I use this for my Instant Pot Breakfast Casserole, but it also works for Instant Pot Lasagna.
- An Egg Tray: Perfect for holding eggs when making Instant Pot Eggs.
- Heat Safe Bowl: An essential for making Instant Pot Oatmeal.
Fan Favorite Instant Pot Recipes
Now you are ready to start using your Instant Pot! Be sure to browse through my Instant Pot Recipes for tested, tried, and true recipes. Below are some fan favorites.


Rachael Gill
Thank you for the news letter it is really appreciated- you are an inspiration and I have been following you on YouTube - love and care from Australia
Kind regards
Rachael
Kristen Chidsey
Thank you so much, Rachael! I am thrilled to have you here (and on a YouTube!)
lesley hunt
I got my instant pot several years ago and found it confusing to use...It has been sitting in my cupboad for quite a while. I want to learn how to use this effectively and cut down on my cooking times.
I have read your information above and am encouraged to use this pot again. I especially am fond of beans and would like to make them myself rather than used canned beans. I guess that will be my next project.
Kristen Chidsey
Hi Lesley! I am so happy to hear this post helped inspired you to try out your instant pot. If you have any issues, please let me know!
Sarah Hendricks
You mention a heat safe bowl/pot for making oatmeal. This is my 3rd instapot (i wore 2 out using them so much!) so I understand how to use it...BUT I don't know why you'd need a special pot for oatmeal. Can I just use an oven safe bowl instead? Thanks.
Kristen Chidsey
Hi Sarah! Several bowls that are oven-safe (like Pyrex) have come out and said they are not safe under pressure and many people reported issues with them. Therefore, I recommend a stainless steel heat-safe bowl 🙂
Roderick
Thanks for the tips.
Diane
I don’t have a yogurt setting… what setting would I use
Thank you for sharing your info.
Diane
Kristen Chidsey
Hi Diane! While harder to make yogurt without a yogurt setting, it can be done. I have instructions on my Instant Pot Yogurt recipe for making it without a yogurt button.
Jacqueline Savukinas
Thanks for the information. It was really helpful!
Kristen Chidsey
So happy to help!
Amanda
I followed the link for a heat safe bowl to make oatmeal in Instant pot. It took me to a pyrex bowl. Is that really safe for high pressure cooking? Your photo shows a stainless steel bowl. Alternatively, can I just make oatmeal directly in the instant pot or does it burn? thanks.
Kristen Chidsey
Hey there! Thank you for catching that. I thought I had updated all of those links since pyrex has come out to say they are not safe for pressure cooking. Here is the stainless steel bowl I use: https://amzn.to/3XVZSDv
John
Hi i have the instant pot Duo 5-7l there is no adjust or manual button so how do i move the less,normal,and more buttons
Kristen Chidsey
Hi John, I am not familiar with the Duo 5-71. Do you happen to mean another model?
Marlene B
Hi,
I would like to use the slow cooker function but do not how. Help?
Kristen Chidsey
Hi Marlene! I have detailed instructions on my post How to Use your Instant Pot as a slow cooker. That should help 🙂
Mary
When making creme brûlée if I use 8oz ramekins instead of 4oz do I need to cook longer?
Kristen Chidsey
Well, it would depend if you used the same amount of custard or doubled the custard. If your ramekins have less volume, they would need less time. This is one thing you would really to trial and error.
Donna
I have had my insta pot duo for 2 years & rarely use. Attempted a pork roast & potatoes before finding you and the roast was tough. I'm intimidated by it.
Kristen Chidsey
Hi Donna! Don't give up because of one recipe! I am here to help. Remember to use natural pressure release (do not immediately release pressure) when cooking meat--especially roasts. Please reach out with any questions any time!
electric pressure cooker
thanks a lot for ur kind information ..It's really helpful.....
Diane De Wolfe
Thank you for the information. I have a question about yogurt. I have made yogurt six times now and I have followed the recipe exactly each time. At least I think that I follow it exactly. Some batches are far runnier than others and I don't know why. This last batch is almost like milk and the batch before was far thicker and I liked it better.
Kristen Chidsey
Hi Diane! It sound like it may be that you set the temperature to low for incubating instead of high? That or your starter was bad. I would be sure to check the temperatures of your cooled milk before incubating, check that the setting is on normal not low, and be sure to let it rest in your refrigerator for 8 hours in the inner pot before stirring. I am not sure the recipe you are following, but I suggest following my recipe for Instant Pot yogurt with detailed instructions for best results.
Steve
bad news i love my instapot think it is one of the best investments i have ever made.
Kristen Chidsey
That's GREAT news!