This post may contain affiliate links. Please see our disclosure policy.
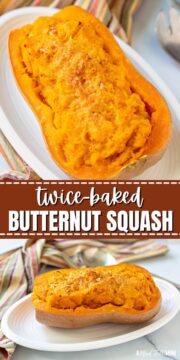
Twice Baked Butternut Squash is the ultimate EASY way to dress up baked butternut squash. Seasoned simply with parmesan cheese and butter, stuffed butternut squash is nutty, buttery, and makes a show-stopping side dish.
Pair Twice-Baked Butternut Squash with Roast Turkey, Crockpot Mashed Potatoes, and Cranberry Orange Sauce for the ultimate Thanksgiving feast.

Everyone knows and loves Twice-Baked Potatoes, but have you ever heard of a twice-baked butternut squash?
If not, it is time to change that!
Just like a twice baked potato, this recipe for Twice-Baked Butternut Squash starts by baking a butternut squash until tender. Once the flesh is tender it is mashed with seasonings and stuffed back into the cavity of the squash, this simple, yet impressive, side dish is nutty, buttery, and downright delicious!
Ingredients at a Glance

- Butternut Squash: Select a butternut squash that feels heavy for its size, uniform in shape, and relatively free of blemishes.
- Butter: Use unsalted butter to control the level of sodium yourself.
- Salt + Pepper: Simple yet perfect seasonings.
- Parmesan Cheese: Parmesan cheese really brings out the natural nutty flavor in the squash. Use freshly grated parmesan cheese for the best flavor, not parmesan from a canister.
How to Make Twice-Baked Butternut Squash
The following tips are provided to help you achieve perfect results. You will find the ingredient quantities and detailed instructions in the recipe card at the bottom of this post.
- Give the Squash a Scrub. Even though you will not be eating the skin of the butternut squash, just like a melon, any time you cut through the flesh of the skin, you want to be sure the outer skin is washed well, so as not to transfer any dirt or bacteria to the flesh of the squash.
- Cut Squash in Half. Cut off the stem of the squash and then proceed to cut the squash in half lengthwise and then scoop out the seeds from the center of the cavity of the squash. Pro-Tip: If you struggle to cut the squash, pop it into the microwave for 3-5 minutes. This will make it much easier to cut.

- Bake Butternut Squash. The secret to perfectly baked butternut squash is to roast it in a baking dish cut-side down in the water. The water will keep the flesh of the squash moist and tender. It is something my grandpa showed me years ago, and to this day, I have found it the best method for baking whole squash.

- Scoop Out Flesh. Once your butternut squash is tender, let it cool slightly just so that you don't burn your fingers when handling it. Once cool enough to handle, scoop out the flesh of one half of the squash, placing the flesh into a medium mixing bowl. For the remaining half, very carefully scoop out a portion of the flesh, leaving a ½-inch border around the edges of the squash.

- Prepare Filling. Mash the baked butternut squash flesh with salt, pepper, parmesan, and butter until smooth.

- Stuff Squash Cavity. Place the reserved half of the squash that is still intact into a dry baking dish and fill the cavity of the squash with the mixture. It is okay if the squash is overfilled slightly and top with additional parmesan cheese.

- Bake Again. The magic of any twice-baked recipe is that the second bake allows the mixture to warm through, caramelize, and develop additional flavor.

Recipe Modifications
- Craving Something Sweeter? Mash the flesh of the baked butternut squash with 1 teaspoon of ground cinnamon or pumpkin pie spice, 2 tablespoons unsalted butter, ½ teaspoon kosher salt, and ¼ cup brown sugar or maple syrup. Stuff the squash cavity as directed. Top with chopped pecans or walnuts if desired and bake as directed for the second time.
- Love bacon? Instead of topping the stuffed butternut squash with parmesan cheese, sprinkle with chopped baked bacon before baking the second time. The bacon will add a smoky, rich flavor.
- Add Additional Flavor: Add up to 1 teaspoon each of onion powder, garlic powder, and/or smoked paprika for additional flavor that will pair well with the butter and parmesan cheese.
- Dairy-Free Modification: Replace the butter with extra virgin olive oil and omit the parmesan cheese.
Serving Suggestions
Twice-Baked Butternut Squash is one of my favorite easy Thanksgiving recipes! But don't just limit this side dish to the holidays. It is pairs wells with Baked Salmon, Pork Chops with Apples, and Homemade Rotisserie Chicken.
Prep-Ahead & Storage Instructions
- Make-Ahead Instructions: You can assemble this stuffed butternut squash up to baking the second time up to 48 hours in advance. Once assembled, place the stuffed squash into an airtight container and refrigerate for up to 48 hours. When ready to bake, remove the stuffed squash from the refrigerator, place on a baking sheet or casserole dish, and bake at 350 degrees F for 45-50 minutes.
- Storing Leftovers: Store leftover baked squash in an airtight container up to 4 days in the refrigerator. Reheat in the microwave on a heat-safe plate until warmed through.
More Butternut Squash Recipes
- Butternut Squash Curry
- Instant Pot Butternut Squash
- Butternut Squash Chili
- Instant Pot Butternut Squash Soup
- Roasted Butternut Squash Salad
- Roasted Butternut Squash
If you enjoyed this recipe for Twice Baked Butternut Squash, I would love for you to leave a comment and review below.
Twice-Baked Butternut Squash

Ingredients
- 1 medium butternut squash, about 2-3 pounds
- 2 tablespoons unsalted butter
- ½ teaspoon kosher salt, divided
- ½ teaspoon ground pepper
- ½ cup freshly grated Parmesan cheese, divided
Instructions
- Preheat oven to 400℉ (200℃).
- Wash and dry the butternut squash. Cut off the stem of the squash and then cut the squash in half lengthwise. Remove the seeds from the cavity of the squash.

- Place the two halves of the squash, cut side down, in a large baking dish. Pour 2-3 cups of cold water into the baking dish, or until the water comes halfway up the sides of the squash.
- Bake the squash for 45 minutes, or until the flesh is fork-tender. Once tender, remove the squash from the oven and let cool for 10 minutes, just until you can handle it.
- Using a spoon, scoop out the flesh of one half of the squash and place it into a large mixing bowl. For the remaining half, carefully scoop out a portion of flesh, adding it to the bowl, but leave ½-inch border of the squash intact. Place the hollowed out squash cavity into a baking dish and sprinkle with ½ teaspoon kosher salt. (Feel free to use same baking dish as before, just drain off the water.)
- To the mixing bowl with the flesh of the squash, add 2 tablespoons of butter, ½ teaspoon kosher salt, ½ teaspoon pepper, and ¼ cup of parmesan cheese. Mix well, until butter has melted into the warm squash and the squash is nice and mashed up.
- Scoop the mashed seasoned squash mixture into the hollowed out half of the butternut squash. Sprinkle the filling with the remaining ¼ cup of parmesan cheese.
- Return the stuffed squash to the oven and bake for 15-20 minutes, or until the cheese is melted and the filling is warmed through.


Notes
Nutrition
Nutrition information is automatically calculated, so should only be used as an approximation.


Thanks for the tip on putting it in microwave to cut easier.
You bake same way I do.
I might want to leave the cheese off & use the leftover to make a pie.
Love it better than pumpkin, but I'll take either.
This was SO delicious! The whole family it!
Amazing how soft and buttery it gets on the second bake - love this easy recipe!
Lightly coat the outside of the grater plate with cooking spray so the food glides more easily (this also makes cleanup easier). When you reach the end of a piece of hard cheese, put it in your palm and rub your hand flat against the grater to prevent knuckle scrapes.
Great tip Louisa! Thank you for sharing.