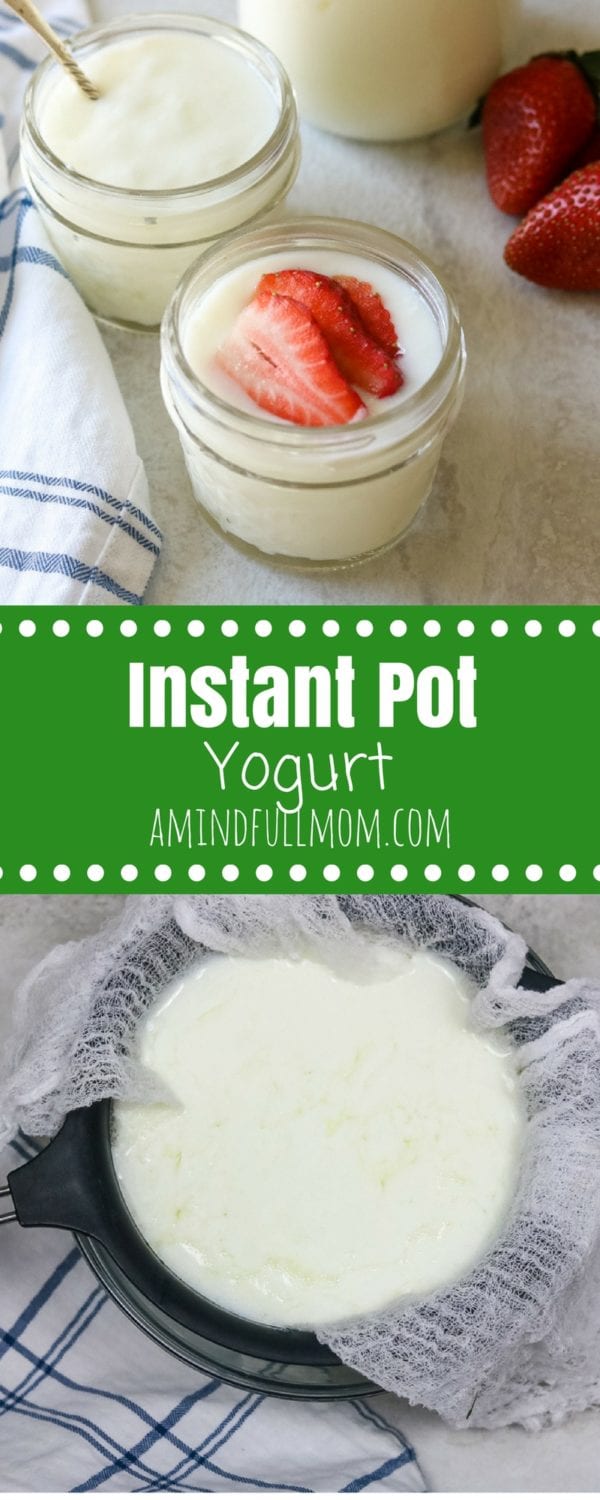
Instant Pot Yogurt: Step by step directions for making yogurt in an electric pressure cooker. Includes directions for nonfat, full fat, and Greek yogurt. Also, ways to naturally sweeten yogurt. This is EVERYTHING you need to know about making Instant Pot Yogurt.

I am all about making things at home when I can.
I prefer to make fruit roll-ups, chicken stock, granola bars, and even rotisserie chicken.
However, making yogurt at home, never appealed to me--and frankly overwhelmed me.
I can purchase high-quality yogurt with simple, wholesome ingredients at every grocery store around me.
But I was intrigued to try my hand at making yogurt shortly after getting my Instant Pot--and let me tell you, I am so glad I gave it a try.
Instant Pot Yogurt

There are two reasons that I will no longer purchase yogurt at the store and make yogurt in my Instant Pot.
- Taste
- Cost
You guys, homemade yogurt is so much creamier and less tangy than store-bought yogurt. The first time my kids had homemade yogurt they asked if I put sugar in the yogurt. Nope just plain yogurt--just a less tangy. But man, they loved it. And so did I.
And the cost of making homemade yogurt is so much cheaper than store-bought yogurt. By making homemade yogurt you cut the cost in at least half!!!
Now that you are intrigued, let's get started.
Making yogurt at home is time-consuming, but NOT at all hard. With an instant pot, it is nearly fail-proof!
How to make Homemade Instant Pot Yogurt
Step One: Clean your Instant Pot.
- This sounds like a no-brainer. But I am not talking about simply washing your Instant Pot--you need to sanitize your inner pot.
- You can prepare your inner pot for making yogurt by pouring boiling water in the inner pot and then discard the water.
- This step can be skipped, but it helps drastically in the flavor of your yogurt--especially if you have been making a lot of Instant Pot Chili.

Step Two: Heat your Milk in your Instant Pot.
- Pour ½ gallon milk into the inner pot of your electric pressure cooker, and put the lid on the Instant Pot (vent can be sealed or not sealed in this function). Hit yogurt function and then the adjust button until it says Boil.
- When the Instant Pot beeps that it is done, remove the lid and test the temperature to be sure the milk has reached 180 degrees.
- I like to leave the inner pot in the Instant Pot for 5 minutes before removing it. This helps the yogurt thicken up a bit better.

Step Three: Cool the milk to approximately 105-115 degrees.
- Cooling the milk to this temperature takes about 1 hour if placed on the counter.
- I like to speed the process up by placing the inner pot into a large mixing bowl in ice water. This takes about 15-20 minutes.

Step Four: Remove the "skin" off the milk.
- Once your milk has reached the proper temperature, skim off the top layer of milk "skin" that has formed on top of the liquid.
- This helps to give you the creamiest of yogurts.
Step Five: Whisk in a yogurt starter.
- Use either prepared yogurt or a yogurt starter and whisk into your prepared milk.
- It is important to note that if using prepared yogurt you need to be sure it is plain yogurt with live and active cultures.
- If your starter is sweetened or does not have live cultures, making yogurt at home will NOT work!
Step Six: Allow your yogurt to Incubate.
- To finish making your yogurt, place your inner pot back in your Instant Pot with the lid on (again, it doesn't matter which way the valve is set).
- Hit the Yogurt button again button.
- Adjust until it reads 8:00 or 8 hours.
- Then let the Instant Pot do its thing.
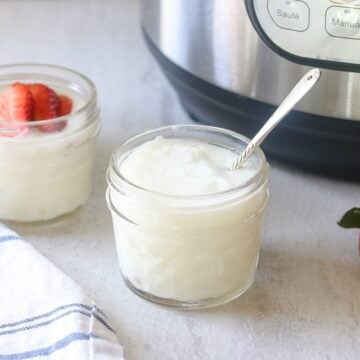
Step Seven: Enjoy!
- Transfer to glass jars or a plastic container.
- Refrigerate and Enjoy!
How to Make Yogurt without a Yogurt Button
It is a bit harder to make yogurt without a yogurt button on a pressure cooker, but it is possible.
- It is a bit harder, but it is possible.
- Pour milk into the inner pot of the pressure cooker.
- Turn on the Sear/Saute function.
- Heat milk to 180°F. Use a thermometer to check the temp often and be sure to stir very often so the milk does not scorch.
- Once the milk reaches 180°F, turn off your pressure cooker.
- Remove the inner pot and cool it to 108 degrees.
- Once your milk has reached 108 stir starter yogurt and whisk until incorporated.
- Put inner pot back in instant pot and place lid on the pressure cooker.
- Wrap in a large towel, or two regular towels and incubate for at least 8 hours or 10 hours.
How to Make Greek Yogurt
- If you would like to make Greek yogurt instead of regular yogurt, follow all the instructions for homemade yogurt.
- Once the yogurt is prepared, place a large strainer lined with cheesecloth over a large mixing bowl.
- You may need to do this in batches depending on the size of your strainer.
- Allow the yogurt to drain in the strainer overnight.
- Scoop out the thick yogurt into containers to store and discard the cheesecloth.

What to do with the extra whey from the yogurt?
- You can either discard the whey or you can use it in smoothies, oatmeal, protein shakes, etc. It will be filled with protein and probiotics.
How to make Instant Pot Fat Free Yogurt
Can you use skim milk to make yogurt in your electric pressure cooker?
Yes, you can, with a few important tips.
- I have found for nonfat yogurt, 3 tablespoons of yogurt added to ½ gallon of milk works best.
- Nonfat yogurt will have quite a bit more liquid on the top than yogurt made with full or reduced-fat milk.
- Just carefully drain off the layer of liquid that forms on the yogurt and discard it.
- As nonfat yogurt sits, the liquid will begin to separate again, just mix it into the yogurt before serving.

How long does Homemade Yogurt last?
- Homemade yogurt should last for up to 10-14 days in your refrigerator.
- Be sure to save 2 tablespoons of your homemade yogurt to make your next batch.
How to Sweeten Homemade Yogurt
I have found homemade yogurt to be so much smoother and a bit sweeter than store-bought yogurt and simply enjoy it topped with fresh berries or homemade granola.
Homemade Vanilla Yogurt
- Make yogurt as directed.
- Mix in 1 tablespoon vanilla extract into prepared yogurt.
- This will flavor the yogurt without any added sweeteners.
**If you like your yogurt to be sweet, you can add in honey, maple syrup, or sugar adjusted to your desired level of sweetness. I would start with no more than ¼ cup, and increase by a tablespoon at a time.
A few tips for making yogurt at home
- I use 1 tablespoon of prepared yogurt for every quart of milk. Therefore for ½ gallon of milk, I whisk in 2 tablespoons of already prepared yogurt into my milk.
- You can cut this recipe in half if you would like. If you have an 8-quart pressure cooker, you can also double this recipe for homemade yogurt.
- Do NOT try to make homemade yogurt with flavored yogurt as your starter. You need to either use a yogurt starter or plain yogurt with active live cultures. How do you know if your store-bought yogurt has live cultures? The label on the yogurt will say Lactobacillus bulgaricus or Streptococcus thermophilus.
- A huge tip for making yogurt in the future is to FREEZE your starter immediately after fresh yogurt is made. I recommend using an ice cube tray. Each ice cube holds 1 tablespoon of yogurt so you will know exactly how much yogurt to defrost when making a new yogurt batch. Just be sure to thaw your yogurt cubes in the fridge to not alter the cultures in the yogurt.
- If you would like tangier yogurt, set an incubation period to 10 hours instead of 8 hours.
- If you need more tips on how to use your Instant Pot or are confused about some of the functions or pieces I mentioned, check out my Instant Pot 101.
- Get more easy, healthy instant pot recipes here.
Homemade Yogurt is great for:
- Yogurt Peanut Butter Dip
- 2 Ingredient Homemade Gogurts
- Peanut Butter Power Smoothie
- Skinny Double Chocolate Zucchini Muffins
- Skinny Spinach Artichoke Dip
How to make yogurt at home in an Instant Pot:
Homemade Yogurt
Ingredients
- ½ gallon milk
- 2 tablespoons prepared yogurt with cultures
Instructions
- Pour milk into inner pot of Instant Pot. Push yogurt button until the screen reads "boil." (Usually you will need to hit the yogurt button two times) This will take about an hour.
- Once the Instant Pot beebs that the boil cycle is complete, carefully remove the lid and test the temperature. It should be around 180 degrees Fahrenheit. Let inner pot sit in instant pot for 5 minutes and then remove inner pot.
- Allow the milk to cool to 105-115 degrees. This will take an hour on the counter top or about 15 minutes if you place your inner pot into an ice bath.
- Gently skim off the "skin" on the yogurt and discard.
- Whisk in the prepared yogurt.
- Place inner pot (be sure to dry off well if you had in ice bath),put lid on and press yogurt button again and then adjust until screen reads 8:00. (The pressure should also read normal--if it reads less, hit adjust again until normal is lit up.)
- Once the pressure cooker beeps that the yogurt cycle is complete, remove the inner pot from the inner pot and cover it with plastic wrap. Refrigerate for 8 hours before transferring to individual containers or stirring the instant pot.
- Once refrigerated for 8 hours, you can strain the yogurt to prepare Greek yogurt and/or set some yogurt aside for future yogurt making. To make Greek yogurt, strain the yogurt in a strainer lined with cheesecloth overnight in the fridge (be sure to place over a large mixing bowl while draining.)
Equipment Needed
Notes
- Instead of prepared yogurt as your starter, you can use a yogurt starter. Just follow directions to determine how much starter to add to ½ gallon milk (each brand is a bit different.)
- You can use any percentage of fat to make homemade yogurt.
- To make Greek yogurt, strain the yogurt in a strainer lined with cheesecloth overnight in the fridge (be sure to place over large mixing bowl while draining.)
- Homemade yogurt should last for about 10-14 days.
- If sweetening yogurt, I have found it is best to add in sweeteners/vanilla after the yogurt has set up in the fridge for at least 8 hours, or after straining.
- If you find your milk is not reaching 180 degrees after the boil cycle, you can turn to saute function for a few minutes, watching VERY closely to help it reach to 180 degrees.
- Nutritional values are approximate and have been calculated using 2% milk. The serving size is approximately 4 ounces.
Susan Ewing
A third, significant reason to make our own yogurt is the plastic containers we save. Fewer in the landfills!
I wasn’t sure how much starter to use so looked it up, 1 heaping tablespoon was the answer.
Kristen Chidsey
I agree about trying to cut back on plastic containers 🙂
Cecil Duffy
I have been making yogurt using this same recipe for about 3 years. I love it. I would then strain it to make the Greek yogurt, This took extra time, but without doing it, the whey would always separate from the yogurt while in the fridge. I started cooking the yogurt for 12 hours. It was thicker and did not separate nearly as much in the storage container. Put it in the pot after supper to and take it out after breakfast.
I did not notice any difference in taste. It could still be drained if you wanted it a little firmer. It's worth a try, unless you enjoy draining the whey.
Kathryn B stubenvoll
I've used your recipe numerous times and we enjoy greatly.
This morning I messed up and added the yogurt starter before cooled down from 180°. Ooooops! I'm going to let cool properly and then add in some more at 115°. Hopefully I haven't ruined a batch and the second "feeding" will take.
Or is your recommendation to just start over.
Kristen Chidsey
Hi Kathryn! I am thrilled to hear you are love this yogurt recipe. I actually would do exactly as you are planning--add new starter after it has cooled.
Rikki
Kristen, thank you for this recipe. I used A2 whole milk, strained it overnight, and the resulting yogurt is divine! It has the thickness of, and tastes like, a cross between cream cheese and plain Greek yogurt. Love, love love!
Kristen Chidsey
YAY! So happy you enjoyed so much!
Crystal
Followed this recipe twice and it works so well and is so simple! Thanks! Do you think it would work to double it?
Kristen Chidsey
Hi Crystal! I double all the time. So happy to hear you enjoyed the yogurt
Cecil Duffy
I have many times used a gallon of milk in my 8 quart Instant. Pot. It makes absolutely no difference in my opinion,
Maureen
I tried making yogurt for the first time yesterday using this recipe. I gave it five stars because it tastes good, and the recipe was easy to follow, but my yogurt turned out kind of chunky and runny… I used a brand new quart of milk so my milk wasn’t bad, and I used two tablespoons of Greek yogurt with active cultures that I had purchased about a week ago. Do you know why my yogurt ended up with this texture?
Kristen Chidsey
Hi Maureen. It may have been that you did not whisk the starter into the milk well before incubating. You can place the yogurt into a blender and blend until smooth to help.
Melody
Just FYI, I teach canning at the local extension and I know that tossing boiling water into the instapot will not sanitize it. You have to either bring the water to a rolling boil and boil for one minute, or use 2 tablespoons of bleach per gallon of water. That said, it is not necessary to do this for the yogurt. I am very sensitive to taste and despite using my Insta pot for curry and other things, it never comes across to the yogurt. Final comment, I have always used Fairlife milk with excellent results. I have tried other ultra pasteurized and shelfstable milks like horizon organic and they all have a much thinner finished yogurt. Fairlife is the only thing I will use now.
Cecil Duffy
I use Walmart milk and it works just fine as far as I am concerned, but I have never used the more expensive milks so I can not compare.
Christy Brescia
Hi Kristen! I am very excited to try making yogurt. Have you used Fairlife milk or other high protein milk?? What would be your suggestion to make a high protein yogurt?
Thanks. You recipe notes were very helpful
Kristen Chidsey
Hi Christy! I love using Fairlife milk to make yogurt. I would recommend using my quick-start method if using ultra-filtered, ultra-pasteurized milk, such as Fairlife. It couldn't be easier to do! Alternatively, you can strain your yogurt or stir in protein powder after it has chilled for 8 hours.
Kerry M Kier
I make this every week. I strain it using a one gallon strainer by Hatrigo. It's perfect thickness and texture. I make instant pot lemon curd and add some to my serving with fresh berries.
It's also economical as it costs me less than 50 cents per serving to make.
Kristen Chidsey
I love hearing this is a staple at your house! And yogurt with lemon curd and berries sounds delightful. Thanks for sharing.
Jermel
Do you leave the opening on the lid to venting or sealing?
Kristen Chidsey
Hi Jermel! Since pressure is not reached, it won't make any difference 🙂
Alicia
I love this recipe and have used it for a few months now. I completely forgot to add the yogurt after skimming off the milk at the top. What can I do? Can I still use it? It seems to just be super liquidy
Kristen Chidsey
Hey Alicia! I would simply add the yogurt now and then incubate again for 8 hours. The milk has already been boiled and cooled so no need to repeat that process.
Lissa
Anyone try this with almond milk?
Kristen Chidsey
Hi Lissa! Unfortunately, I have not been able to replicate Almond milk yogurt successfully--however, I do have a recipe for Coconut Milk Yogurt
Paul
Sanitising my Instant Pot container is unecessary because this will happen anyway when you use the 'boil' function to pastuerise the milk. After 400 batches, I've never had a problem. Also, if you like to have tangy yoghurt, you can do it for a lot longer than 8 hours. I typically do 12 to 18 hours, depending on whether I want it sweet (such as when I flavour with vanilla) or tart.
Tabitha
I tried this recipe and when I checked the yogurt the following morning the consistency was very watery. Why didn't mine set and is there a way to correct it?
Kristen Chidsey
Hi Tabitha! I am sorry you had issues, I know that is frustrating! It is likely because your yogurt setting was on low not normal. So be sure to check that. At this point, I would recommend using the same milk and processing again with additional starter.
Paul
Hi Tabitha. I've made over 400 litres of yoghurt using my instant pot. There are a few things you can do to get thicker yoghurt. The first is to make sure you are using the 'boil' function to pastuerise the yoghurt. This is important because as well as pastuerising, it 'denatures' the milk proteins (breaks them apart) so they can then rejoin as a solid yoghurt. To make the 'denaturing' is effective, you can run the 'boil' function twice so that the milk is held at high temperature for longer. Secondly, you can add some dried milk powder before using the 'boil' function. Adding 1/4 cup of milk power per liter of milk is a good amount, or you could try a little more if you want it even thicker. It makes a big difference. Thirdly, adding a little more starter yoghurt can help. Fourthly, you can do it for longer than 8 hours. I usually do around 16 hours because I like my yoghurt to be tangy. Finally, be sure you are using the correct setting for fermenting the yoghurt - not everyone realises there are two different yoghurt temperature settings on the instant pot (aside from the 'boil' function), and it is the second temperature setting that you need to use for standard yoghurt. The first temperature setting is slightly lower and is for other kinds of fermentation.
Graciela
Such an easy and simple recipe! Made yogurt in the instant pot for the first time and it turned out so delicious! I used lactose free milk/yogurt and it turned out perfect! Will definitely be using this recipe again! 🙂
Kristen Chidsey
Thank you for sharing, Graciela 🙂
Lauren
Should the lid be vented or sealed during the boiling and 8 hour process?
Kristen Chidsey
Hi Lauren! It won't make any difference if the lid is vented or sealed, as no pressure is reached 🙂