
This post may contain affiliate links. Please see our disclosure policy.
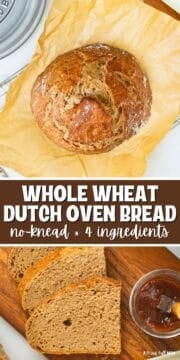
Dutch Oven Bread is hands-down the easiest way to make homemade whole wheat bread. No kneading, no fancy equipment! Just a few minutes of prep and a handful of ingredients and you can easily create a beautiful loaf of artisan whole wheat bread right at home!
This No Knead Whole Wheat Bread is crusty on the outside, tender on the inside, and full of hearty flavor. It is the perfect starter bread recipe as it is simple, forgiving, and rewarding.

Kristen's Keys for No-Knead Whole Wheat Bread

While an exceptionally easy recipe, I have a few key pointers to keep in mind before starting.
- You must use a Dutch Oven. This no-knead bread must be baked in a 3½ to 6-quart heavy-duty dutch oven that can withstand temperatures up to 450℉ (230℃). No other pan will conduct heat in the same way.
- Measure flour with care. A kitchen scale is the most accurate way to measure flour when making bread (or ANY baked good). If you don't have a scale, use a spoon to scoop the flour into the measuring cup, rather than scooping directly from the canister.
- Use active dry yeast NOT rapid rise or Instant yeast. We want a slow and steady rise.
- The flour is interchangeable. Whole wheat flour gives this bread a hearty flavor, but you can use white wheat flour or all-purpose flour for a lighter texture.
- Parchment paper is optional but helpful. It makes lifting the bread in and out of the Dutch oven seamless. Just be sure to use parchment paper safe up to 450℉ (230℃).
- Plan to make the dough at least 8 hours prior to baking the bread. You need time to let the yeast work it's magic.
Happy Cooking! xo Kristen
5-star Reader Review
This is the absolute best no knead bread recipe I have ever tried. It's hearty and moist and any add-in you throw at it turns out wonderful! -LouAnne⭐⭐⭐⭐⭐
How to Make No-Knead Dutch Oven Bread
Making bread at home can feel intimidating. But with this easy no knead whole wheat bread recipe and my step-by-step guidance, there is no need to be intimidated. 😉
Step One: Measure Flour
The most accurate way to measure the flour is to place a mixing bowl on a kitchen scale, zero it out, and set it to measure in grams. Scoop flour into the bowl until the scale reads 500 grams.
👉🏻No Scale? Lightly spoon flour into a measuring cup and level. You will need 3¾ cups of whole wheat flour.

Step Two: Combine Dough
Add the yeast and salt to the mixing bowl and whisk to combine. Add the warm water, and using a wooden spoon or spatula, stir until just combined. It is meant to be a shaggy (slightly damp) dough.
👉🏻Your water should be between 100-115℉ (38-46℃ ). Any colder water won't activate the yeast, while hotter water can kill the yeast. Use a digital thermometer for accurate results.

Step Three: Let Rest
Cover the mixing bowl with a clean kitchen towel or piece of plastic wrap and let sit at room temperature for at least 8 hours or up to 18 hours. I find 12 hours to be perfect! This slow rise develops incredible flavor and gives the dough that beautiful airy structure.

Step Four: Preheat the Oven and Dutch Oven
When you are ready to bake the bread, place the Dutch Oven in the oven and turn the oven to 450°F (230℃). Preheating the Dutch oven helps create that signature crusty exterior.
👉🏻 Using an Enameled Dutch Oven? A few brands state not to preheat empty (most say preheating in the oven is fine, just not on the stove--check your manual carefully). Simply skip the preheat and add an additional 5-10 minutes to the baking time.
Step Five: Shape Dough
While the oven is preheating, use the time to shape the dough. Remember it is meant to be a rustic dough, so don't worry about it being perfect. The less you work the dough, the better.
- Place a piece of parchment paper onto the counter and very lightly dust with flour.
- Turn the dough onto the parchment paper and shape into a circle with lightly floured hands.
- Brush off excess flour from dough and parchment paper and let rest until oven is fully preheated.

Step Six: Bake
Carefully transfer the shaped dough into the preheated Dutch oven, cover, and bake for 30 minutes. Then uncover and bake for an additional 20 minutes, or until the crust is deep golden brown.
👉🏻 Unsure if your bread is fully cooked? Stick a digital thermometer into the center of the loaf. The internal temperature should be between 207-209°F (97-98℃).

Step Seven: Cool
The hardest part about making this bread is waiting for it to cool! But in order to prevent it from being gummy and next to impossible to slices, you need to let it fully cool. Immediately remove the bread from the Dutch Oven and let cool on a cooling rack for at least 30 minutes before trying to slice.

Recipe Notes & Modifications
- Vary the Flour: While this recipe is written using whole wheat flour, you can swap it out for white whole wheat flour, whole wheat pastry flour, bread flour, all-purpose flour, or a combination of flours. Whatever flour is used, it must measure 500 grams. And because different varieties of flour have different weights, a scale is critical here. Gluten-free flour blends and self-rising flour are not recommended!
- Optional Additions: Add up to 1 cup of chopped nuts (walnuts, almonds, or pistachios), seeds (pumpkin seeds, sesame seeds or sunflower seeds), and/or dried fruit (raisins or dried cranberries) to the flour mixture before adding water to the dough. (Or try my cranberry walnut bread recipe.)
- Dutch Oven Size & Recommendations: A smaller Dutch oven yields a higher, rounder loaf, while a larger Dutch oven causes the dough to spread more. While still delicious, the bread will be flatter. I prefer a 4-quart Dutch oven for a beautiful tall loaf. And while the Staub brand is my favorite, Lodge Dutch ovens work well and are much more affordable.
- Storage Tips: Once fully cooled, wrap well in plastic wrap or place in an airtight container. Store at room temperature and use within 3 days. Alternatively, wrap well in foil, place in a freezer-safe bag, and freeze for up to 1 month. Defrost at room temperature. For best results, slice as needed rather than slicing all at once--this will prevent the bread from drying out.

Serving Suggestions
This artisan-style whole wheat bread is heartier and chewier than my honey whole wheat bread and reminds me a bit of the texture of sourdough bread. It is perfect toasted, slathered with butter, or served alongside one of the following cozy soups:
No-Knead Whole Wheat Bread

Video
Ingredients
- 500 grams whole wheat flour, ~3¾ cups
- 2 teaspoons kosher salt
- 1 teaspoon dry active yeast
- 2 cups warm water, between 100-115℉
Instructions
- Place a large mixing bowl on a kitchen scale, change units to grams, and zero it out. Add whole wheat flour until the scale reads 500 g (for 500 grams.) To measure flour without a scale, fluff the flour in its container, then spoon into a measuring cup, leveling off the excess. Measure out 3¾ cups whole wheat flour and place in mixing bowl (see recipe notes if using a different variety of flour).

- Add 2 teaspoons kosher salt and 1 teaspoon dry active yeast to the flour and mix well to incorporate. Add 2 cups warm water to the flour mixture and use a wooden spoon or spatula to mix until the flour is fully moistened. Resist the urge to overmix. Stop mixing once there are no longer any dry pockets of flour.

- Cover the mixing bowl with plastic wrap or a clean kitchen towel, and let rest at room temperature for at least 8 hours or up to 18 hours.

- After the dough has risen, turn out the dough onto a lightly floured piece of parchment paper or lightly floured surface. Lightly flour your hands and then roughly shape the dough into a circle. The dough will be sticky! Brush excess flour off the dough ball and parchment paper and let the dough rest while the oven preheats.

- Place the Dutch oven pan, fitted with a lid, into the oven and then set to preheat the oven to 450℉ (230℃), with the pan in the oven.
- Once the oven is preheated, carefully remove the pan from the oven and carefully drop the shaped bread into the heated pan.

- Place the lid on the Dutch oven and bake for 30 minutes covered. Carefully remove the lid and bake for an additional 20 minutes, or until the bread is golden and the internal temperature of the bread reaches 207-209°F (97-98℃).

- Remove bread from dutch oven and let cool on wire rack for 30-45 minutes before slicing and serving.

Equipment
- kitchen scale the most accurate way to measure flour!
Notes
Nutrition
Nutrition information is automatically calculated, so should only be used as an approximation.
This post was originally published in 2017 but has been updated in 2025 .




What if I don’t have a Dutch oven? Can I still make this? I don’t want it to be too low almost like a flat bread.
Hi Deesha, unfortunately, this recipe is designed for a dutch oven or a thick bottomed pan with a lid that can withstand temperatures up to 450 degrees.
Hello, I made my dough using instant yeast, 1 teaspoon, and unexpected it has risen so high merely after an hour and half. I used 110 F warm water, and half whole wheat half all purpose. Everything else the same. Can you tell me possibly why that happens? It’s already late at night, should I put it in the fridge to stop fermenting so fast?
Hi Elise, this recipe is for active dry yeast, not instant yeast. Instant Yeast will rise quicker than active dry and change the timing of this recipe. Placing in the fridge will mess with the fermenting process and final texture of the bread. I would let rest overnight and then bake immediately in the morning.
I baked it this morning, but I think since it’s fermented for too long, it has a really strong alcoholic smell starting from the first 30 minutes in oven. Next time I really should use active dry yeast!
I am sorry Elise, yes, as indicated in the post, this recipe does require active dry yeast. However, maybe it will taste like sourdough??? (here's hoping for you!)
Well actually it was only the smell during the baking process. The bread came out delicious!! No sour taste at all 🙂
Wonderful! So glad it turned out Elise!
A brilliant receipt this. I have made this loaf 4 times now, and it never fails. If you want a variant, chop 1 cup of walnuts and 7-8 tried figs and put it into the dough (and let to stand over night). A very nice bread that lasts for many days, if you can resist that is!
I am so so glad you enjoyed so much Niclas! And I love the idea of adding figs!! YUM
I'm excited to try this tonight! In the past when I've tried whole wheat, it's always been extremely dense so here's hoping...just a clarification, I was thinking of adding sunflower seeds-do you suggest toasting? If so, how much (1/4 cup?) and when should I add them (in the dry flour prior to mixing?). Also, the figs sound delicious but since I don't have figs, how bout dates? Chop and add along with the seeds?
Thanks so much for your help for this novice baker!
Hi Purvi! I hope you enjoy this recipe. As for seeds, toasted is best--and then let cool before adding to dough. Add the seeds along with the flour and no more than 1/4 cup. For dates, I have not personally tried dates, but it sounds delicious. Just be sure to not add dates coated in sugar. I would add up to 1/2 cup and add with flour as well.
Can I use fresh active yeast instead of active dry yeast. Do I need to prove the fresh yeast
How much fresh would I use, if I need 1 teaspoon of dry yeast,and would it change rise time.
Hi Maria! It is a bit trickier but can be done. I have directions under common baking substitutions For every 1 teaspoon active dry yeast = 3/4 teaspoon instant yeast. Keep in mind if using instant yeast over active dry yeast, it will not need to prove like active dry yeast.
Hi Kristen. This is my third try and I just can’t get the dough to rise enough. It is always way too sticky and wet. I have proofed my yeast so that isn’t the issue. Any chance I could cut back on the water? I know this is user error but would appreciate any suggestion you may have. This bread looks and sounds amazing!
Hi Cile! I am so sorry you are having issues. This bread does not require proofing the yeast, so that may change the way the bread rises. You try cutting back the water by 1 or 2 tablespoons or you may want to try using half wheat flour and half all-purpose to see if that helps achieve the texture you want. Also, be sure your water is not too hot.
Hi
I made this bread and though it was good (and so easy to make) it didn’t rise as much as your photo suggests, nor did it have the nice cracks on the top of the crust.i was careful to shape it gently and quickly, and I let rise for 13 hours. Wondering if less rise time and maybe I should use flour mass instead of measuring cups. Can you give the mass of the flour used? Please advise. Thanks!
Hi Lauren! It may have been that you used more flour than I do. One tip is to scoop your flour into the measuring cup using a spoon, instead of scooping right into the measuring cup. If you weighed the flour, you would use 460 grams.
Wahey! Turned out amazing! Soft, risen bread with an amazing crust - exactly what I was after. It was also incredibly simple. This is definitely going to become my go-to recipe. Also thank you for all your help while I was in the process, Kristen!
YAY! Thank you so much for letting us all know how it turned out Doniya! I am happy to help and love that you mastered this recipe!