This post may contain affiliate links. Please see our disclosure policy.
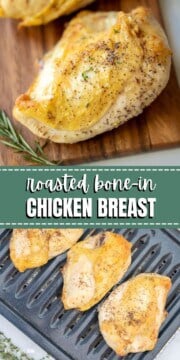
This Split Chicken Breast recipe delivers juicy, tender roasted bone-in chicken breast with minimal prep and simple, inexpensive ingredients.
Whether served with twice baked potatoes and roasted broccoli or used in a recipe calling for cooked chicken, you will love the versatility of this inexpensive split chicken breast recipe.

Reasons to Choose Split Chicken Breasts
When it comes to purchasing chicken breast, the majority of people opt for boneless, skinless chicken breasts, as they cook up fast and can be used in endless ways. And while I love using boneless, skinless chicken breasts for recipes like Honey Lemon Chicken Skillet and Blackened Chicken, when it comes to roasted chicken breasts, using split chicken breasts, or bone-in chicken breasts, is the better option.
Not only is skin-on, bone-in chicken much less expensive than boneless, skinless chicken breasts, but the bone and skin work together to deliver the perfect roasted chicken breast.
As the split chicken breast roasts, the fat from the skin slowly renders into the meat, giving the chicken incredible flavor while helping to prevent moisture loss. And roasting meat of any kind with the bone intact, adds flavor and helps to keep the meat tender and juicy -- just as my oven rotisserie chicken recipe proves.
Simple Ingredients

- Split Chicken Breasts: Split chicken breast is a skin-on bone-in whole chicken breast that has been split into two pieces. It is typically sold labeled as bone-in chicken breasts OR split chicken breast.
- Oil: A bit of extra virgin olive oil will help the skin to become crispy and brown.
- Seasonings: Keep the seasonings simple with just salt and pepper or heavily season the chicken--the option is yours and are endless! But I have provided some of my favorite seasoning variations.
How to Roast Split Chicken Breast
The following tips are provided to help you achieve perfect results. You will find the ingredient quantities and detailed instructions in the recipe card at the bottom of this post.
- Use your hands to rub the oil and seasonings into the chicken breasts. This will help the seasonings really adhere to the chicken and every bit of the chicken breast be well-seasoned.

- Bake with an oven-safe thermometer. If you have an oven-safe digital meat thermometer, now is the time to use one. Insert the probe into the thickest part of one split chicken breast and set the temperature to 165 degrees F which is the perfect temperature for chicken. The alarm will sound when the chicken is cooked, ensuring perfectly cooked, always juicy chicken.
- Rest before serving. Allow the roasted chicken to rest for 5-10 minutes before serving, as this will allow the juices to redistribute and the chicken to stay nice and juicy.

Flavor Variations for Roasted Chicken Breast
- Sweet & Smoky: Use 1-2 tablespoons of homemade dry rub for a sweet and spicy variation of baked split chicken breasts. Delicious served with barbecue sauce as well.
- Italian-Seasoned: Along with the olive oil, season the chicken with 1 teaspoon each of kosher salt, Italian seasoning, and garlic powder. Add a pinch of crushed red pepper flakes if desired.
- Swap Out the Salt: In place of the salt use Homemade Seasoned Salt or Adobo Seasoning, for a simple, yet more nuanced flavor.
- Poultry Seasoning: Along with the olive oil and salt, season the split chicken breasts with 1-2 teaspoons of poultry seasoning before baking.
- Lemon Garlic: Combine 2 tablespoons of olive oil with the zest of 1 lemon, 1 teaspoon kosher salt, and 2 cloves of minced garlic. Use to rub all over the chicken bake as directed.
Serving Suggestions
- As an Entree: Roasted chicken breast is delicious served as an entree alongside your favorite side dishes. I love serving the chicken with something that also needs roasted, like Italian Roasted Vegetables or Roasted Potatoes and Carrots.
- For Meal Prep: I recommend baking extra bone-in chicken breasts to use in recipes calling for pre-cooked or leftover rotisserie chicken. Once baked, remove and discard the skin, remove the meat from the bone (feel free to use the bones to make homemade chicken stock) and shred or dice it into bite-size pieces. This will make the chicken perfect to use for recipes like Homemade Chicken Pot Pie, Chicken Enchilada Casserole, Creamy Cheesy Chicken and Rice, or Waldorf Chicken Salad.
Storage Instructions
- Refrigerate: Allow the chicken to cool and then, if desired, remove the chicken from the bone and shred or dice it into bite-size pieces. Place the chicken into an airtight container and store it in the refrigerator for up to 3 days.
- Freeze: Place the diced or shredded chicken into airtight freezer-safe bags and store it in the freezer for up to 3 months. To use frozen cooked chicken, allow the chicken to defrost overnight in the refrigerator or add the frozen chicken directly to casseroles before baking or to simmering soups.
More Staple Chicken Recipes
- Instant Pot Chicken Breasts
- Homemade Rotisserie Chicken
- Slow Cooker Drumsticks
- Instant Pot Whole Chicken
- Air Fryer Chicken Breast
- Air Fryer Chicken Wings
If you enjoyed this recipe for roasted split chicken breasts, I would love for you to leave a comment and review below.
Roasted Split Chicken Breasts

Video
Ingredients
- 3 large split chicken breasts, (bone-in, skin-on chicken breasts)
- 1 tablespoon extra virgin olive oil
- 2 teaspoons kosher salt
- ½ teaspoon black pepper
Instructions
- Preheat the oven to 375℉/190℃. Line the bottom of a broiler pan then the rack on top of the lined pan. Note: If you don't have a broiler pan, use a baking sheet topped with a heat-safe cooling rack.
- Pat 3 large split chicken breasts dry with a few sheets of paper towels. Drizzle the chicken with 1 tablespoon extra virgin olive oil, 2 teaspoons kosher salt, and ½ teaspoon black pepper. Use your hands or a pastry brush to evenly distribute the oil and seasonings over each side of the chicken breasts.
- If you have an oven-safe thermometer, insert the probe into the middle of the thickest chicken breast. Set the alarm for 165℉/74℃. Alternatively, bake the chicken until the meat is no longer pink at the bone and the juices run clear. This will take about 45 to 60 minutes, depending on the thickness of the chicken. An instant-read thermometer inserted in the thickest part of the breast meat should read 165℉/74℃.
- Remove the chicken from the oven and loosely tent with foil. Allow the chicken to rest for 10 minutes, for the juices to redistribute.
- Once your chicken has been rested, you can serve immediately with fresh herbs as desired, or use the meat for meal prep or a recipe that calls for pre-cooked chicken.
Notes
- Sweet & Smoky: Use 1-2 tablespoons of homemade dry rub for a sweet and spicy variation of baked split chicken breasts. Delicious served with barbecue sauce as well.
- Italian-Seasoned: Along with the olive oil, season the chicken with 1 teaspoon each of kosher salt, Italian seasoning, and garlic powder. Add a pinch of crushed red pepper flakes if desired.
- Swap Out the Salt: In place of the salt use Homemade Seasoned Salt or Adobo Seasoning, for a simple, yet more nuanced flavor.
- Poultry Seasoning: Along with the olive oil and salt, season the split chicken breasts with 1-2 teaspoons of poultry seasoning before baking.
- Lemon Garlic: Combine 2 tablespoons of olive oil with the zest of 1 lemon, 1 teaspoon kosher salt, and 2 cloves of minced garlic. Use to rub all over the chicken bake as directed.
Nutrition
Nutrition information is automatically calculated, so should only be used as an approximation.
This post was originally published in 2014 but updated in 2024.


I have made this recipe four times now, and every time it is a hit! My family keeps asking me to make it. It is very easy to prepare. Next time I make it, I am going to double the sauce because we like to have extra to put it over rice. Thanks for a great recipe! ~Amy
Amy, This was a wonderful way for me to start my day. I love hearing that people enjoy my recipes. I am so grateful for you taking the time to share this with me. Have a fabulous day!
I love a Roasted Chicken, this is a great tutorial. Hope you are having a great day and thanks so much for sharing your awesome post with Full Plate Thursday.
Come Back Soon!
Miz Helen
Hello sweet lady! Great post. Pinned. We appreciate you taking the time to party with us. We hope to see you on Monday at 7 pm. We love partying with you!http://loulougirls.blogspot.com/
Happy Monday! Lou Lou Girls
Surprised not to see an air fryer option in this recipe. Is there some reason why bone in breasts shouldn’t be cooked on the air fryer??
Thanks!
Hi Fred! Great question! You can use your air fryer, simply season as desired and cook at 350 degrees F for 20 mintues, flip and continue to air fry for 20-30 minutes, or until the chicken reaches 165 degrees F.
Great tutorial here! Thanks for linking up over at the linky party! We hope to see you again this coming Wednesday!
looks great! love the idea of making extra and freezing for later. And duh me, never thought to freeze my bones to make broth later. Thanks for these tips and the recipe!
Kristen, thanks for this tutorial. I always have trouble getting all the meat off the bones when I chop. Do you have any tips for that?
Thanks for sharing at the Retro Re-Pin Party. Pinned.
Hey Julie. I find that it is best to let the meat cool and then get in there with your hands. It is never easy to get the meat off if you use utensils. Hope that helps!
I should do this more often. When a recipe calls for shredded chicken, I almost always use boneless skinless chicken breast- and I boil it. How much more flavorful would this be?! Also, cheaper! Great idea. I like to shred my chicken in the kitchen aid. While it's still warm (and after removing bone and skin), you just put it in the mixer with the paddle attachment and it shreds perfectly. I freeze it to have on hand later, like you mentioned.
Roasting chicken is so much more flavorful--and yes, the Kitchen Aid tip is a great one!! I like my meat in larger chunks, so I just chop it.