This post may contain affiliate links. Please see our disclosure policy.
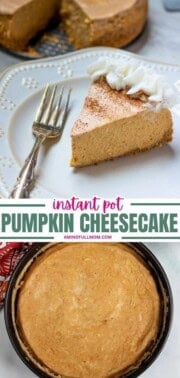
Instant Pot Pumpkin Cheesecake is a show-stopping, yet easy dessert recipe! Made with a gingersnap crust and a richly spiced pumpkin cream cheese batter, this Instant Pot Pumpkin Cheesecake turns out perfect every time.
If you love pumpkin pie and you love classic cheesecake, you will love this easy Instant Pot Pumpkin Cheesecake recipe. It combines the best of two classics into one delicious dessert!

Kristen's Keys for Instant Pot Pumpkin Cheesecake
Because we are using the Instant Pot to bake the pumpkin cheesecake, this recipe couldn't be easier! No water bath OR cracks on your cheesecake. But I have a few more tips to ensure creamy perfection.
- Use Room Temperature Ingredients. Bring cream cheese and eggs to room temperature 3-4 hours before starting to ensure a smooth batter.
- Use the Right Pan: Use a 7-inch springform pan, or 7-inch cake pan to fit inside the Instant Pot.
- Don't Over Mix the Eggs. Once you add the eggs to the cheesecake batter, mix lightly to just combine. This will help prevent incorporating air into the batter, which results in a deflated, cracked cheesecake.
- Swap out Your Sealing Ring. It is best to have two sealing rings. One for savory dishes and one for sweet to avoid flavor transfer.
- Make in Advance. It best to prepare the cheesecake at least 8 hours (or a day) before serving so that the flavor has time to deepen. (Making this recipe the perfect make-ahead Thanksgiving recipe!)
How to Make Instant Pot Pumpkin Cheesecake
The following tips are provided to help you achieve perfect results. You will find the ingredient quantities and detailed instructions in the recipe card at the bottom of this post.
- Prepare Cheesecake Crust. Using a food processor, pulse together the gingersnap cookies and pecans until they are broken down into crumbs. Add the melted butter and pulse until mixture resembles wet sand. Press the crust in a 7x3-inch springform pan that has been lightly greased. Place the crust in the freezer while assembling the cheesecake filling.
- Prepare Pumpkin Cheesecake Filling. In a large mixing bowl, beat the cream cheese, pumpkin puree, sugar, and spices on low speed until just smooth. Add in the eggs, and mix until JUST combined, being careful to not overmix the batter.
- Assemble Cheesecake. Remove the crust from the freezer, pour the filling into the pan, and gently tap down the cheesecake on the counter to remove air bubbles. Cover the cheesecake with a piece of foil to prevent condensation from forming on it during pressure cooking.
- Pressure Cook. Pour 1-½ cups of cold tap water into the inner pot. Add the trivet, then place the cheesecake on the trivet. Set to cook on high pressure for 45 minutes.
- Let Pressure Release Naturally. Once the cooking time has elapsed, allow the pressure to release naturally for AT LEAST 15 minutes.
- Chill and Serve. After letting rest for 10 minutes at room temperature, cover and refrigerate the Instant Pot Pumpkin Cheesecake for 8-12 hours before serving with homemade whipped cream if desired.

Recipe Modifications
- Swap out the Gingersnaps: In place of gingersnap cookies, feel free to use an equal amount of chocolate sandwich cookies, graham crackers, or Biscoff.
- Nut Free: Replace the pecans with an equal amount of gingersnap or graham cracker crumbs to keep the crust (and recipe) nut-free.
- Use Homemade Pumpkin Puree: When using fresh homemade pumpkin puree, it is crucial to drain off some of the liquid to match the consistency of canned pumpkin puree. Place the pumpkin puree in a fine-mesh strainer lined with cheesecloth over a large bowl. Refrigerate for a couple of hours and then measure out ½ cup of pumpkin puree to use.
- Crispy Crust: For a crunchier crust, bake the cheesecake crust at 350 degrees F for 10 minutes prior to adding the filling and pressure cooking.
Storage Instructions
- Refrigerate: Once pressure cooked and cooled, place a paper towel or piece of parchment paper over the pan, to help prevent condensation, and then wrap with foil or plastic wrap. Store the cheesecake in the refrigerator for up to 4 days.
- Freeze: Remove the cheesecake carefully from the springform pan and wrap it in a layer of plastic wrap and then a layer of foil. Place the wrapped cheesecake in a freezer-safe bag and freeze it for up to 1 month. Allow the frozen cheesecake to defrost in the refrigerator overnight before serving.
More Instant Pot Cheesecake Flavor Variations
Instant Pot Pumpkin Cheesecake

Ingredients
Gingersnap Crust
- ¾ cup gingersnap cookie crumbs, ~about 10 gingersnaps
- ¼ cup pecans
- 2 tablespoons unsalted butter, melted
Pumpkin Cheesecake Batter
- 16 ounces full-fat cream cheese, at room temperature
- ½ cup canned pumpkin puree, *see note using homemade
- ⅔ cup granulated sugar
- 1 tablespoon cornstarch
- 1 teaspoon cinnamon
- ½ teaspoon grated nutmeg
- ½ teaspoon vanilla extract
- 2 large eggs, room temperature
Instructions
Gingersnap Crust
- In a food processor fitted with an s-blade, about 10 gingersnap cookies (to equal) ¾ cup gingersnap cookie crumbs with ¼ cup pecans until they resemble crumbs. Be sure the mixture is equal to about 1 cup of crumbs. If not, add in a couple more cookies and process again.
- Add 2 tablespoons unsalted butter (melted) to the food processor and pulse until the mixture resembles wet sand.
- Press the mixture into a lightly greased 7 by 3-inch springform pan or cake pan and then place the crust into the freezer while preparing the cheesecake filling. Alternatively, bake the crust at 350℉/175℃ for 10 minutes for a crispier crust.
Instant Pot Pumpkin Cheesecake
- In a large mixing bowl, beat 16 ounces full-fat cream cheese, ½ cup canned pumpkin puree, ⅔ cup granulated sugar, 1 tablespoon cornstarch, 1 teaspoon cinnamon, ½ teaspoon grated nutmeg, and ½ teaspoon vanilla extract on low speed until just smooth and creamy. Add 2 large eggs and beat on low speed until JUST combined.
- Pour the batter into the prepared crust, tap on the counter gently to remove air bubbles, and cover the pan tightly with foil.
- Pour 1½ cups cold tap water into the inner pot and add the trivet. Place the pumpkin cheesecake on the trivet inside the Instant Pot and place the lid on the Instant Pot, being sure the vent knob is pointed towards sealed.
- Set to cook on high pressure for 45 minutes by hitting the manual button or pressure cook button and use the +/- buttons to adjust the time to 45 minutes.)
- Once cooking time has elapsed, allow the pressure to release naturally for 15 minutes. Release remaining pressure and remove cheesecake from Instant Pot.
- Allow pumpkin cheesecake to cool for at least 10 minutes before removing the foil. After 10 minutes, remove the foil, and gently use a butter knife to loosen sides from pan.
- Place a paper towel or piece of parchment paper on top to the pan, cover with plastic wrap or foil, and refrigerate for 8-12 hours before serving. The towel will help absorb condensation.
Notes
Nutrition
Nutrition information is automatically calculated, so should only be used as an approximation.


I am a little concerned about the cooking time: top of recipe says cook time 40minutes pressure time 15 mins ? in the actual recipe it says cook 45 minutes. I am confused?????????
Please reply.
I will triple check for mistakes Georgine. But I think what you are seeing is that you need to cook for 45 minutes on high pressure. But then I also state to let pressure release AFTER cook time for at least 15 minutes. So set cook time for 45 minutes. After that time is up, leave the instant pot alone for 15 minutes before trying to force a release of pressure. I hope that helps to clarify and that you enjoy 🙂
Seriously amazing recipe! thank you!
Absolutely divine!! And easy, too!
I am so glad you enjoyed Heather! Thank you for taking the time to leave a comment.
I don't have a spring form the right size to fit in my instant pot- can I bake in the oven?? How long?
Hi Asil! I am sure this can be baked in the oven, but I have not tried this recipe in the oven--nor do I know the size of pan you are using (which would influence the bake time greatly). However, if you do bake in the oven, please let everyone know so they can try it out too. And Happy Thanksgiving!
Thanks! I think I'll do a water bath in oven and see what happens:) I'll let you know if it works.
I am planning on making this on Wednesday for Thanksgiving. In reading the instructions I read to cook for 45 minutes and in the comments I read your answer to "Brian" telling him that he was correct - that 30 minutes was the correct cooking time. Now I''m really confused. Also surprised at your comment that you don't like to cover while cooking. Now I don't know if I should cover it with foil or not.
Hi Pat! I updated this recipe to be more foolproof--as stated in the bottom of the recipe card. So I know find it best to cover with foil and bake for 45 minutes. I will make a note to my comment to make it less confusing. Sorry about that!
Hi, I'd like to make this for Thanksgiving, but I only have an 8-inch springform pan. Can I use it instead of 7-inch? My instant pot is 8 quarts, so the 8-inch pan does fit inside it fine. Thanks -- love your recipes!
Hi Cyndi! Thank you so much for your kind words--so glad you enjoy my recipe. To make this in an 8 inch pan, you will need to make a few adjustments. You may need to increase the ingredients of the crust--I would use 1 cup of gingersnap crumbs and 3 tablespoons of butter. And the cook time will be different, since the batter will spread differently. I would cook for high pressure on 40 minutes. I have not tried these adjustments myself, but I think those adjustments will work 🙂 I hope you enjoy!
I made a pumpkin cheesecake last Christmas, but used some inadvertently purchased gluten free Annie’s snickerdoodle cookies for the crust and it was SO good! The little bit of cinnamon made it taste like a pumpkin pie and my friend, who has Celiac, was able to eat it!