This post may contain affiliate links. Please see our disclosure policy.
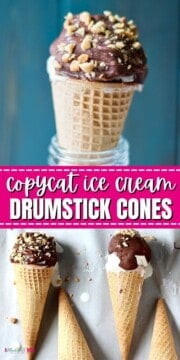
Skip the ice cream truck and make your own Copycat Drumsticks Ice Cream Cones using this easy recipe! With creamy ice cream, a crisp chocolate shell, and crunchy peanuts, this recipe recreates everything you love about the classic treat using simple ingredients.
Looking for more delicious frozen treats? Check out my recipes for Homemade Fudgesicles, Watermelon Granita, and Frozen Yogurt Bark.

My Favorite Nostalgic Summer Treat

One of my favorite frozen treats from my childhood was was a Drumstick Ice Cream Cone. The contrast between the creamy, soft ice cream and the rich chocolate coating with crunchy nuts--perfection!
Fast forward a few decades, and I still love Drumsticks! I just prefer to make them myself. Not only does this homemade version save you a few pennies, but the quality of the ingredients is a million times better.
Plus, making Ice Cream Drumsticks is the perfect activity for kids. It's easy, fun, and hands-on--what kid doesn't love scooping ice cream and sprinkling on toppings?
Happy Cooking! xo Kristen
Recipe Highlights
Notes on Ingredients
Use vanilla ice cream with a chocolate coating and chopped nuts for a classic drumsticks ice cream cone or get creative with toppings and ice cream flavor. Let your imagination and taste buds guide you.

- Ice Cream Cones: For an authentic Drumstick Ice Cream Cone, use sugar cones. Alternatively, make a super-sized drumstick cone using a waffle cone.
- Ice Cream: Use any ice cream you like! Homemade vanilla ice cream, store-bought ice cream, or no-churn ice cream, are all great options.
- Chocolate: Use any variety of chocolate chips or chopped chocolate bars you like. I personally love dark chocolate.
- Coconut Oil: Adding coconut oil to the melted chocolate helps the chocolate to solidify quickly which is crucial when working with ice cream. It also adds a nice shiny finish.
- Toppings: Chopped nuts, candies or sprinkles. Or omit altogether.
How to Make Drumsticks Ice Cream Cones
The following tips are provided to help you achieve perfect results. You will find the ingredient quantities and detailed instructions in the recipe card at the bottom of this post.
- Melt a Small Amount of Chocolate. Place a couple tablespoons of chopped chocolate or chocolate chips in a small bowl. Microwave in 30-second intervals until melted, stirring after each interval. Add a bit of coconut oil and stir to incorporate into the melted chocolate.
- Coat the Cone with Chocolate. Working with one cone at a time, drizzle about a teaspoon of melted chocolate into each cone. Use a pastry brush, spoon, or butter knife to help spread the melted chocolate, evenly coating the entire interior with a thin layer of the chocolate. I find a butter knife works best.

- Fill Cones with Ice Cream. Fill the base of the cone with ice cream and then add a scoop of cream to the top of the cone. Immediately transfer the ice cream cone to a baking sheet in the freezer.

- Freeze. Let the filled ice cream cones sit in the freezer for an hour so that the ice cream is frozen solid. Don't skip this step, or the ice cream will melt when coated with melted chocolate.
- Melt the Remaining Chocolate. Right before removing the prepared ice cream cones from the freezer, melt the remaining chocolate in a microwave-safe bowl in 30-second intervals, stirring between each interval, until the chocolate has melted. Stir the coconut oil into the melted chocolate until fully incorporated.
- Coat Ice Cream with Chocolate. As long as your ice cream is frozen solid and hard to the touch, you CAN dip it quickly into the melted chocolate. But be sure to work quickly and only grab one cone from the freezer at a time. Alternatively, you can spoon the chocolate over the ice cream.
- Add Toppings. Immediately after coating the ice cream with chocolate, sprinkle chopped peanuts, or other desired toppings, over the chocolate before it sets up. Return the ice cream cone to the baking sheet in the freezer, grab another cone, and repeat the process.

Kristen's Key Tips
- Don't skip coating the cone with chocolate. This keeps prevent sogginess and keeps the cone crispy and crunchy.
- Use a jar to hold the cone upright. This makes filling it with ice cream much easier and less messy.
- Have a pan lined with parchment paper in the freezer. That way you can quickly add assembled cones to the freezer.
- Have toppings ready. Before dipping the ice cream into the melted chocolate, be sure to have your chopped nuts (or other toppings) ready and close by. The chocolate hardens quickly, so you need to work quickly.
Dietary Modifications
My favorite thing about Homemade Ice Cream Drumsticks, is that you can make this treat allergy-friendly so EVERYONE can enjoy a Drumstick cone!
- Dairy-Free: Use your favorite dairy-free ice cream and dairy-free chocolate.
- Gluten-Free: Use gluten-free ice cream cones and check your ice cream to ensure it is gluten-free. Some varieties of ice creams, such as cookie dough, can have added sources of gluten.
- Nut-Free: Skip adding nuts to the chocolate coating and carefully check the ingredient label on your ice cream.
- Coconut-Free: In place of the coconut oil, use a neutral oil like canola oil.
- Egg-Free: Carefully check ingredients on cones and opt to use an egg-free ice cream, such as my recipe for no-churn vanilla ice cream.
More Delicious Summer Dessert Recipes
Did you make this recipe?
If you enjoyed this recipe, please leave a comment with a 5-star review at the bottom of the post. Thank you!
Homemade Drumstick Ice Cream Cones

Video
Ingredients
- 2 ounces chocolate chips or chopped chocolate, for coating cones
- 1 teaspoon coconut oil, for coating cones
- 6 sugar cones
- 48 ounces ice cream , any variety
- 14 ounces chocolate chips or chopped chocolate, for dipping ice cream cones
- 2 tablespoon coconut oil, for dipping ice cream cones
- ½ cup chopped nuts or sprinkles, optional
Instructions
- Line a cookie sheet with parchment or wax paper and place it into the freezer.
- Place 2 ounces of chocolate chips in a small bowl and microwave in 30 seconds intervals, stirring between each interval, until the chocolate is completely melted. Stir in 1 teaspoon of coconut oil until smooth.
- Using about 2 teaspoons of melted chocolate, drizzle the inside of each cone with a bit of the melted chocolate. Use a pastry brush, small spoon, or butter knife to spread the chocolate evenly in the cone. Let the cones sit for a couple minutes to let the chocolate harden fully.
- Working with one cone at a time, fill the sugar cone with ice cream. Top with a scoop of ice cream to form a dome. Immediately place the cone on the parchment paper in the freezer and repeat the process until each cone is filled with ice cream. Freeze until solid, about an hour.
- Place the remaining 14 ounces of chocolate in a large microwave-safe bowl. Microwave in 30 seconds intervals, stirring between each interval, until the chocolate is completely melted. Stir in 2 tablespoons of coconut oil until smooth.
- Remove one ice cream cone from the freezer at a time, and working quickly, spoon the melted chocolate over the ice cream to coat or dip to coat. Immediately sprinkle with chopped peanuts or sprinkles, if desired.
- Place the assembled ice cream cone back on lined sheet, grab another cone, and repeat the process. Once the ice cream drumstick cones are assembled, freeze for 30 minute before serving.
- After 30 minutes, serve or place prepared drumstick cones into an airtight freezer-safe container for up to 2 weeks.
Notes
Nutrition
Nutrition information is automatically calculated, so should only be used as an approximation.


GIVE ME ALL THE CHOCOLATE! <3 These look so lovely, Kristen!
🙂 Thanks Lauren!
Great for summer! Such a lovely ice cream.
Thanks Megan.
Love these for summer! What a fun project to do with kids too!
A great project with kids too!
These look fantastic and totally bring me back to my childhood! My kids love these too. Great post Kristen!
Thanks Lauren 🙂
Such wonderful memories...this officially marks the start of summer! Drumsticks were always a favorite in our house...love this homemade treat. xo, Catherine
Thanks Catherine! It is a great way to enjoy summer!
Your Drumsticks are way cooler than any store bought ones! Oh and tell me who these people are that don't have peanuts and chocolate in their house. Hmmm! If they are not allergic then there is no good excuse! lol
Totally agree with you Cindy. Food allergies are the ONLY reason you should not have these in your house!
Where we live the store bought nutty buddies are a the traditional dessert after a crab feast. We are hosting one in a few weeks. I'm going to try my hand at these....won't that be a treat?
That would be AMAZING Monica. From the crab feast to dessert--your guest are going to be some lucky people!