This post may contain affiliate links. Please see our disclosure policy.
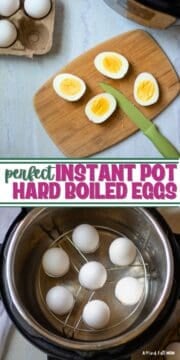
Instant Pot Hard-Boiled Eggs are my go-to method for perfectly cooked hard-boiled eggs every time. They are easy to peel, consistently cooked, and come together with almost no effort.
Love eggs? Don't miss my recipes for Instant Pot Egg Bites, Instant Pot Frittata, and my nifty hack for making eggs for Instant Pot Potato Salad.

Kristen's Key Tips for Perfect Hard Boiled Eggs
I used to struggle to get consistent results when making hard-boiled eggs. Some were overcooked, others undercooked, and peeling them was the worst. Once I started using this foolproof Instant Pot method, I began getting perfect hard-boiled eggs every single time. And with my easy recipe and a few tips I've learned along the way, you can too!
- Start with one egg to test timing. While the 5-5-5 timing works 90% of the time, everyone's altitude, Instant Pot model, and preferences vary slightly. Rather than risk a whole dozen eggs, start with one to dial in the timing. Once you find what works for you, jot it down and stick with it.
- Always use cold water. The time it takes for cold tap water to come to pressure is a critical part of my calculated timing and cooking process.
- Room temperature eggs work best. They are less likely to crack and they cook more evenly. You can always place cold eggs in a bowl of lukewarm water (not hot) for 10-15 minutes to speed up the process.
- Farm-fresh eggs are fine. They can be a little harder to peel, but still cook beautifully.
- An egg rack is optional. It helps keep the yolks perfectly centered, but a standard trivet works just as well to hold the eggs above the water.
5-star Reader Review
I could seriously cry happy tears at how easy these were to peel. "Peel" isn't even the right word - I tapped the egg on it side, the shell broke in half, and the egg practically fell out! There was no peeling! And perfectly cooked! THANK YOU!!!! -Amanda
The 5-5-5 Method
My process for making hard-boiled eggs in the Instant Pot is often referred to as the 5-5-5 Method.
- 5 minutes pressure cooking
- 5 minutes natural release
- 5 minutes in an ice bath
This simple formula has helped millions of readers achieve perfect hard-boiled eggs since I first shared it in 2018!
While slight adjustments may be needed (that is why I suggest starting with 1 egg), the 5-5-5 method is the best place to start. In over 90% of cases, it results in perfectly cooked eggs that peel like a dream.
How to Make Hard Boiled Eggs in Instant Pot
While hard-boiling eggs in the Instant Pot is exceptionally easy, I want to break down the 5-5-5 process so you can feel confident in each step, whether you're just learning to use the Instant Pot or already a seasoned pro.
Step One: Prepare Instant Pot
In order for pressure to build, you need to add water to the inner pot. For accurate timing, use cold tap water and adjust the amount of water based on the size of your Instant Pot.
- For a 3 or 6-quart Instant Pot: Add 1 cup of cold tap water
- For an 8-quart model: Add 1½ cups of cold tap water
Next, add an egg rack or trivet inside the pressure cooker. This will elevate the eggs above the water, cooking them evenly and gently.
Step Two: Add Eggs
Place room temperature eggs on the trivet or in an egg rack. It is okay to stack the eggs on top of eachother for a large batch. This will not impact timing.


Step Three: Pressure Cook
Secure the lid on the Instant Pot, make sure the vent knob is sealed or locked, and using the manual or pressure cook button, set to cook for 5 minutes on high pressure.
Step Four: Let Pressure Release
After the cooking time has elapsed, let the pressure release naturally for EXACTLY 5 minutes. I suggest setting a timer so you don't lose track of time.
During this time, I recommend preparing an ice bath, which is simply a large bowl of water with ice. That way once the 5 minutes have passed, you can transfer the eggs immediately to the ice bath, which will stop the cooking process and ensure perfect hard-boiled eggs.
Step Five: Release Remaining Pressure
After the 5 minutes has passed, you need to do a quick release of pressure. To do this, use the handle of a long spoon to knock the vent knob from the sealed position to the venting position. Remember to stand back to prevent being burned by the steam coming out of the venting knob.
Step Six: Ice Bath
Using a potholder or tongs (the eggs are hot), transfer the eggs from the Instant Pot to the prepared ice bath. Let them sit there for at least 5 minutes. Again, this will stop the cooking process and make peeling the hard boiled eggs that much easier.

Step Seven: Peel
After 5 minutes in the ice bath, remove the eggs and gently roll them on the counter to crack the shells. And then watch that peel slide right off!

How to Store Hard Boiled Eggs
Once you have made hard boiled eggs, you can opt to enjoy immediately, use them to make homemade deviled eggs or homemade egg salad, or store to enjoy as a snack or breakfast throughout the week. Keep in mind that I find it is easiest to PEEL hard boiled eggs immediately after they are removed from the ice bath.
- Peeled Eggs: Store peeled eggs in an airtight container in the refrigerator for up to 3 days. To extend their shelf life, keep the peeled eggs submerged in water in the refrigerator, changing the water every other day, for up to 7 days.
- Unpeeled Eggs: Refrigerate for up to 7 days in the shell. Mark the carton to avoid confusion with raw eggs.
Recipe FAQs
This is usually caused by overcooking. You may need to adjust the timing slightly yolks. I would recommend reducing the cook time to 4 minutes on high pressure with 4 minutes of natural pressure release.
Be sure to use cold water and adjust for altitude for accurate timing. If the issue still persists, adjust the cook time to 6 minutes on high pressure.
Remember room temperature eggs tend to crack less. But you can still safely enjoy an egg that cracked during the cooking process. It may just not be suitable for deviled eggs. 😉
More Basic Instant Pot Recipes
This Instant Pot Hard Boiled Eggs recipe is my top Must-Make Instant Pot Recipe and alone, makes the Instant Pot well worth the investment. That said, you can use your Instant Pot to make so many amazing things that will save you both time and money. Browse all of my Instant Pot recipes HERE or check out a few staples below:
Instant Pot Hard Boiled Eggs

Video
Ingredients
- 1-12 large eggs, *at room temperature
- cold tap water, for cooking
Instructions
- For a 3 or 6-quart model, pour 1 cup of COLD tap water into the inner pot of the Instant Pot. For an 8-quart model, use 1½ cups COLD tap water.
- Place an egg tray or metal trivet inside inner pot and carefully set as many eggs as desired in the egg tray or on the rack. It is okay if they are stacked on top of eachother.
- Place lid on the pressure cooker, ensuring the vent knob is sealed or the lid is locked. Set the cook time to 5 minutes on high pressure by hitting manual or pressure cook and using the +/- buttons to adjust to 5 minutes.
- While the eggs are cooking, prepare an ice bath. Fill a large mixing bowl bowl halfway with ice cubes, then add enough cold water to submerge the eggs.
- After the cooking time has elapsed, let the pressure release for exactly 5 minutes. Then do a quick release of remaining pressure by using the handle of a long utensil to knock the vent knob from the sealed to the venting position. Stand back to prevent yourself from being burned by steam.
- Carefully remove the eggs from Instant Pot and place them into the prepared ice water bath. I find using tongs or a pot holder helps here as the eggs are hot.
- After 5 minutes, remove eggs from the water, pat dry, peel, and enjoy!
Equipment
- Electric Pressure Cooker (6 or 8 quart) the Instant Pot Duo is my favorite!
- Egg Rack or skip the rack and use the trivet
Notes
Nutrition
Nutrition information is automatically calculated, so should only be used as an approximation.
This post was originally shared in 2018 and updated in 2026.


Has never failed me yet! Thanks'
I have made hard boiled eggs several times in the IP and they almost always come out green. I even reduced to 4 mins and still green. ☹️
Hi Rhonda! I am sorry that happened. I would be sure your eggs are at room temperature and use cold water. That should help.
Hello, I've successfully used your method many times to make lovely hard-boiled eggs, but when I tried it today, I got poached or medium boiled eggs. I pressure-cooked it for five, naturally released for four (I prefer them and it has worked before!), and then ice bathed them (though I usually prefer to leave them for 20 minutes in the ice bath).
Do you have any thoughts on why this happened? I'd really like to not have this happen again. We have found a use for the eggs as they are, but really wanted egg salad, which these don't work for very well!
Thank you in advance!
Hi Dawn! It sounds like either your water was warm (always use cold tap water for the timing to work right) OR your instant pot was on LOW not high pressure.
I have loved my IP from the first time I used it. This makes it even more lovable!
So in the video you put 2 cups in. The measuring cup you used is a 2 cup measuring cup, and you filled it to the top, so does that mean it should be 2 cups of water?
Hi Gideon! Use 1 cup of water for a 3 or 6-quart Instant Pot and 1.5 cups for an 8-quart Instant Pot.
Your method is sound and the eggs were done for this I should be giving you 5 stars but, I found the white to be a little rubbery and the yolk too dry for my liking as I prefer a creamy yolk like you see in ramen. I just bought a new Mutricook 6 qt version of the instant pot which I could find where I'm at in the UAE as I'm traveling for work. It suggested to do a 5 minute initial cook so I thought I'd give you method a go. The eggs were straight out of the fridge and did not crack during cooking and the shells came off so well the egg didn't even require rinsing to remove fragmented shell, I did not have ice for an Ice bath but did water bath them in cold water. Typically in my IP, I wouldn't go anything over 7 minutes with a quick release and cold water bath. Oh, I should also mention that the outer yolk didn't turn green of gray as they can due to the hydrogen and sulfur being over heated from over cooking. All toll it took 18 minutes 20 seconds from start to finish following your method. Thanks for sharing.
Hi Robb! For ramen, you may enjoy my soft cooked eggs, or cooking for 1-2 minutes less. I am glad you had a good experience overall though.
I accidentally did a quick release, then let them sit 5 minutes after releasing pressure. Then the 5 minute ice bath….. they turned out great, super easy to peel.
Thanks for sharing that you still had success.
Is there one particular step that makes the eggs easy to peel (or not)?
I used water from my berkey since egg shells are porous & I don't like the chlorine in my tap water. My eggs sat out for about 10 min but were not quite room temp when I put them in my 6 qt ip. I used a cup of berkey water in my ip & did the 5-5-5 timing. I used berkey water & ice for the ice bath. The eggs were VERY difficult to peel. Each one had to be rinsed under the open berkey faucet to remove stuck on pieces of shell. The yolks were perfect but as I peeled, I noticed a "skin" that was stuck to the egg in some places and to the inside of the shell in other places. Where should it have been & how do I get it to stay there?
I have eaten plant based for 14 years so I don't remember how boiling eggs on stovetop would come out. My husband is lacto-ovo vegetarian so I decided to boil eggs for him. He didn't care about the ugly messed up surface of the whites & neither did I. But I do care about the work involved in peeling the eggs. I need a new tip or no more boiled eggs for hubby. Suggestions?
Hi Dana! Were you using farm fresh eggs? They are notoriously harder to peel. Letting them age for a few days makes a huge difference. Another tip is to try rolling the egg on the counter and peel under running water. I hope that helps.