This post may contain affiliate links. Please see our disclosure policy.

These Easy Bean Burritos are the kind of recipe that saves dinner when time, energy, or ingredients are running low. Made with simple pantry staples, they come together in about 15 minutes for a meal that's both affordable and satisfying.
I've made these refried bean burritos more times than I can count. They're my go-to when I'm too tired to cook and almost always stocked in my freezer for a grab-and-go lunch I know my kids will actually eat.

Kristen's Keys for Refried Bean Burritos
This recipe is simple and flexible, but a few small upgrades (and one sneaky mom trick) make a big difference.
- Refried beans need a boost. Seasoning them with a bit of homemade taco seasoning and salsa prevents the burritos from tasting flat.
- Trust me on the pumpkin (my sneaky mom trick). It blends ALMOST completely undetected into the refried beans. It adds subtle sweetness to balance out the spice, along with a nice boost of nutrients.
- Add rice to make these burritos more filling. When my kids were little, beans, pumpkin puree, seasoning, and cheese did the trick. Now that they're older (and always hungry), rice helps bulk them up into a meal that actually keeps everyone full. That said, sometimes I just love a good old bean burrito with nothing but cheese and beans.😊
- Warm your tortillas first. It takes 15-20 seconds, but it matters makes them soft and flexible, which means easy rolling. Cold ones crack and test your patience (or at least MY patience).
5-Star Reader Review
Thank you for this wonderful burrito recipe. Everyone enjoyed them both young and old. The pumpkin made it so smooth and anded a slight sweetness. I boiled dry pintos and just smashed them. Also, I used gluten free wraps. I warmed them on a cast iron skillet on the stovetop. Delicious! Everyone wants them again next week 🙂-Janet
Notes on Ingredients
This recipe for bean burritos is extremely versatile and can be adapted to accommodate dietary restrictions. Use the following to help you select the ingredients that work for you.

- Refried Beans: You can opt to use homemade refried beans or canned for convenience.
- Pumpkin Puree (optional): Any orange vegetable puree, like pumpkin, butternut squash, sweet potato, or carrot, works well here. You can use canned, homemade, or even a couple jars of baby food puree.
- To Season: Taco seasoning (or individual spices) plus any salsa you like -- smooth, chunky, mild, spicy, etc.
- Rice (optional): Added for bulk, but can be omitted if you don't happen to have any leftover cooked rice on hand.
- Cheese: Cheddar, Colby, or a Mexican blend are the natural choice here. Omit if dairy-free.
- Tortillas: I recommend using burrito-size flour tortillas, as they're large, soft, and flexible for easy rolling. Corn tortillas tend to rip and tear too easily. Specialty gluten-free tortillas and homemade flour tortillas also work well.
How to Make Refried Bean Burritos
Mix the filling, fill the burritos, roll and serve or freeze to enjoy when time is really short!
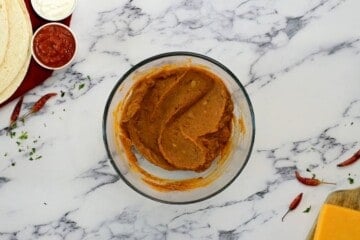
Step One: Prepare Filling
In a large heat-safe mixing bowl, combine refried beans with salsa, seasonings, and pumpkin puree. Once smooth, fold in the rice (if using) until it is well distributed throughout the bean mixture.
At this point, you can microwave the bean burrito filling until warm to the touch. I typically assemble the burritos with a cold filling and then heat as desired.

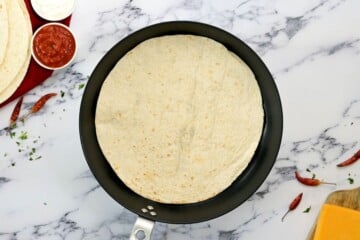
Step Two: Fill and Wrap
Heat the tortillas in a dry skillet for 15-30 seconds per side or microwave in a damp paper towel for 30-40 seconds. I prefer using the microwave, as you can heat several tortillas at once.
Spoon about ½ cup of filling into the center and top with shredded cheese.
To wrap the burrito so that the filling stays put, think of it like an envelope. Fold in the sides, then roll from the bottom up, tucking tightly as you go.

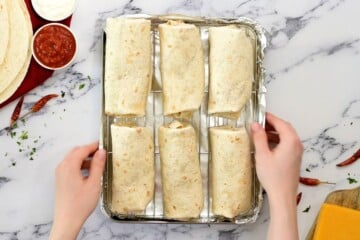
Step Three: Serve Immediately or Bake for Crispy Results
At this point, you bean burritos are ready to enjoy or ready to be stashed in the fridge or freezer to enjoy at your convenience.
But if you like a crispy crust on your bean burrito, I recommend baking the assembled burritos before serving. It adds about 10 minutes to the overall time, but makes dinner feel a bit more put together and who can resist that crispy crust? Not me! Simply plop the assembled burritos right on a baking sheet or use a baking rack for even circulation (as I did in the picture below), and bake until golden.

Recipe Modifications
- Keep it SUPER Kid-Friendly. For the ultimate kid-friendly dinner or for anyone who struggles with texture, simply omit the rice and salsa.
- Put Leftover Rice to Use: If you have Spanish rice or cilantro lime rice on hand, add that to the burrito filling and omit the salsa. The flavor of the rice will help to flavor the burritos.
- Skip the Pumpkin: Replace the pumpkin puree with an equal amount of refried beans.
- No Refried Beans? Mix the rice, salsa, and taco seasoning with 1 can of drained and rinsed pinto beans or black beans. You can still add the pumpkin puree, but it may be visually detected , causing some picky eaters to complain.😉
- Skip the Microwave: If you would like to enjoy warm, soft bean burritos but don't care to use the microwave, heat the refried bean/rice mixture in a medium saucepan over medium heat until warmed through. Warm your tortillas in a dry skillet, stuff, roll, and enjoy.
- Gluten-Free: I really enjoy using Siete or La Tortilla cassava flour, as both hold together well when filled and wrapped and don't leave a bitter aftertaste.
How to Freeze Bean Burritos
I LOVE stocking my freezer (and now my son's college dorm freezer) with homemade bean burritos. They reheat beautifully and are perfect for a lunch on the go or a meal suitable for a dorm room kitchen. 😉
- Place the assembled burritos on a baking sheet and place them in the freezer to freeze until solid, about 1 hour. This step will prevent the burritos from sticking together when frozen.
- Once frozen, transfer the burritos to a freezer-safe container or storage bag and store in the freezer for up to 3 months.
- To reheat the burritos from frozen use the microwave or oven.
- Microwave (Softer Texture): Wrap burrito in damp paper towel and microwave for 2 minutes, flip, and continue to heat for 1 minute longer, or until warmed through.
- Oven (Crispy Texture): Bake at 375°F for 20-25 minutes until heated through and crisp.
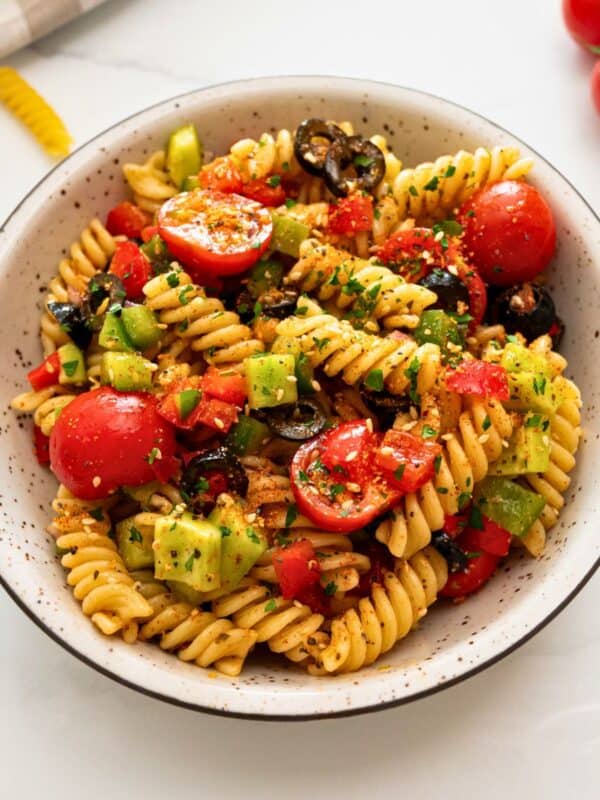
What to Serve with Bean Burritos
Refried Bean Burritos can be served plain or topped with sour cream, black bean corn salsa, blender salsa, or guacamole, just like classic tacos. Pair them with one of the following for a wholesome weeknight dinner.
Did you make this recipe?
If you enjoyed this recipe, please leave a comment with a 5-star review at the bottom of the post. Thank you!
Refried Bean Burritos

Video
Ingredients
- 1 (16-ounce) can refried pinto beans
- 1 cup 100% pumpkin puree, optional
- 1 tablespoon taco seasoning
- ½ cup salsa
- 2 cups cooked rice, optional
- 1 cups shredded cheddar cheese, optional
- 8 large (8-10 inch) tortillas
Instructions
- In a large heat-safe mixing bowl, combine refried beans with pumpkin puree, salsa, and taco seasoning, mixing until smooth and well incorporated. If desired, fold in the rice, mixing to evenly combine. If you are planning to enjoy these bean burritos immediately (and don't want to bake them for a crispy crust), cover the bowl with a damp paper towel and microwave in 60-second intervals until the filling is evenly warmed through.

- Heat the tortillas until just warm and pliable. You can do this by wrapping them in a damp paper towel, placing on a large heat safe plate, and heating for 30-40 seconds, or until just slightly warm. Alternatively, heat them one by one over medium heat in a dry skillet, for 30 seconds per side.
- Scoop about ½ cup of the bean mixture into the center of each tortilla, spreading the mixture down the center of the tortilla. Top with 2-3 tablespoons of shredded cheese.
- Wrap the burritos by folding in the sides of the tortilla and then fold the bottom of the tortilla up and over the filling, rolling tightly to close. At this point, you can enjoy your burritos immediately, bake for a crispy crust, or refrigerate/freeze to enjoy at a later time.
- For crispy bean burritos, place the assembled burritos on a baking sheet seam side down. Bake at 400℉ (200℃) for 10-12 minutes, or until the burritos are warmed through and golden. Alternatively, toast in a lightly greased nonstick skillet over medium-high heat until golden. Serve as desired.


Notes
Nutrition
Nutrition information is automatically calculated, so should only be used as an approximation.
This post was originally published in 2016 but was updated in 2026.


Thanks Kristen for giving me the idea about the pumpkin purée. I made a batch of these(16) and added scrambled eggs and froze for breakfast burritos. I just heat in my toaster oven as microwaves are dangerously toxic. Yummy
What a great idea to add to breakfast burritos too! I am going to try myself! Thanks for sharing.
These were wonderful. I used homemade pinto beans and brown rice. About how long did you bake them for?
Hi Sharon! I love hearing you enjoyed the burritos. As for baking, bake at 400 degrees F until the burritos are warmed through and golden--about 10-12 minutes.
My first time eating burritos and absolutely amazing! My family love them!! My kids eat them all the time but yes it was my first time and I thought they were absolutely amazing!!
Love hearing this, Diane! And appreciate you taking the time to leave a review.
Thank you for this wonderful burrito recipe. Everyone enjoyed them both young and old. The pumpkin made it so smooth and anded a slight sweetness. I boiled dry pintos and just smashed them. Also, I used gluten free wraps. I warmed them on a cast iron skillet on the stovetop. Delicious! Everyone wants them again next week 🙂
Thanks so much for sharing, Janet! I am thrilled to hear your family enjoyed as much as mine.
So easy and delicious! Yum! I tried the 6-8 inch large taco tortillas. They worked well but felt small when wrapping them. Next time I will try the 10 inch burrito tortillas for the extra space.
I highly recommend this recipe if you are looking for easy lunch or easy dinner option. Love that you can freeze them easily and they taste amazing when you microwave them according to the directions.
These are delicious and so satisfying! I admit that I wasn't so sure when adding the pumpkin. But it is what makes these so satisfying and creamy inside. They are wonderful baked in the oven. I saved what was left and reheated them in the oven the next day. They were even better the second time! Thank you for this delicious recipe 😊
You are so welcome! I am happy to hear you didn't let the pumpkin deter you!
Hi, so just to confirm you don't bake prior to freezing, is that correct?
Thank you! Can't wait to try this!
That is correct, Holly.
Another "Great" recipe.