This post may contain affiliate links. Please see our disclosure policy.
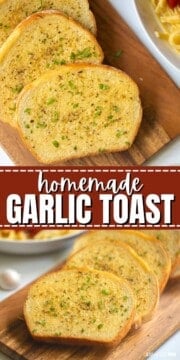
If you love Garlic Texas Toast, you will LOVE this recipe for Homemade Garlic Toast! Not only does it taste better than store-bought garlic toast, but it also is extremely easy to make!

In my book, meals like Baked Rotini, Pasta Puttanesca, Homemade Lasagna, and Instant Pot Lasagna Soup, are simply enjoyed more when accompanied with a side of garlic toast or bread of some sort!
And while I love my recipe for Seasoned Breadsticks, I find myself turning to THIS recipe for Homemade Garlic Toast time and time again!
In This Post
Reasons to love homemade garlic toast
- Incredible Flavor. Buttery, garlicky, and crispy--what is NOT to love about Garlic Toast?! And trust me when I say, homemade Texas Toast tastes EVEN better than store-bought!
- Quality Ingredients. Store-bought garlic bread, garlic toast, and Texas toast are made with tons of additives and preservatives. This recipe for homemade garlic toast is made with only 5 simple ingredients!
- Super Easy Recipe. Making homemade garlic toast only requires a few minutes of time. In fact, it is just about as easy to whip up as it is to open a package of Frozen Garlic Toast. And the flavor is FAR superior!
- Adaptable. When you make Texas Toast at home, you can easily adapt the recipe to accommodate food allergies or preferences.
- Freezer-Friendly. That's right! You can replace the box of Texas Toast with a bag of your own homemade garlic toast ready to be ready and waiting for you to enjoy when the craving strikes or to pair with Instant Pot Spaghetti for an easy dinner!
Ingredients Needed

- Bread: You can opt to use thickly sliced bread or a loaf of store-bought or homemade Italian Bread to make Garlic Toast.
- Butter: Unsalted butter is best so that you can control the level of sodium added yourself. If using salted butter, omit salt from seasonings.
- Garlic Powder: While you may think using fresh garlic is best, it can burn easily when toasted, so I find that using garlic powder eliminates that risk and still flavors the garlic toast perfectly.
- Oregano: I like to use either a pinch of oregano or Italian Seasoning to add additional flavor to the garlic toast. Feel free to omit this addition.
- Salt: Kosher salt is best, as it will help to enhance the flavor of the garlic toast without making it taste overly salty.
recipe modifications
- Lower Fat Modification: You can opt to only spread one side of the bread with the garlic butter, using half the amount this recipe calls for.
- Dairy-Free Garlic Toast: If you are dairy-free, use olive oil in place of butter for Dairy-Free Garlic Bread.
- Softer Garlic Toast: If you like your garlic toast softer, bake at 375 degrees for 4-6 minutes per side, instead of at 400 degrees F.
How to Make Garlic Toast
The process of making homemade garlic toast is nearly as easy as popping frozen Texas Toast in the oven.
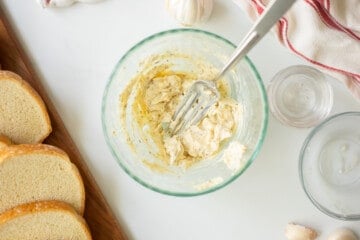
- Prepare Garlic Butter. Mix softened butter with garlic powder, dried oregano, and salt. Be sure to mix well so that everything is evenly incorporated.

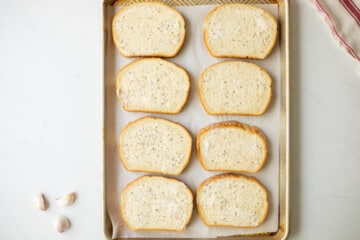
- Spread Bread with Garlic Butter. Spread an even, thin layer of garlic butter on each side of the bread and place the buttered garlic bread onto a baking sheet that has been lined with parchment paper.

- Bake Garlic Bread. Just like frozen Texas Toast, you will want to flip your homemade garlic toast, halfway through baking, so that each side becomes golden and evenly toasted.

Serving Suggestions
Garlic Toast pairs well with ENDLESS meals. From pasta dinners like Skillet Lasagna to Vegetable Pasta to Instant Pot Fettuccine Alfredo, to soups like Broccoli Cheddar Soup to Instant Pot Tomato Soup, to more creative pairings like topping this Garlic Toast with cooked Instant Pot Italian Beef or Crockpot Pulled Pork, your family will NEVER tire of this recipe.

How to Freeze Homemade Garlic Toast
Don't let your leftover bread go to waste! Use it to make a batch of Homemade Garlic Toast to stock in your freezer and enjoy whenever the craving strikes.
- How to Freeze: Spread sliced bread with the garlic butter and then place it on a parchment-lined baking sheet. Pop the baking sheet into the freezer and freeze for 20-30 minutes, or until the garlic bread's surface is frozen solid. Remove slices of garlic bread from parchment paper place in a freezer-safe bag and store in the freezer for up to 3 months.
- To Bake Garlic Toast From Frozen: Preheat the oven to 400 degrees F. Remove as many slices of garlic toast as desired from the freezer and place it on a baking sheet, lined with parchment paper. Bake for 7 minutes on one side, flip, and bake for an additional 5-7 minutes or until golden.
Meals that Pair well with Garlic Toast
- Easy Baked Rotini
- Bolognese Pasta
- Lasagna Soup
- Pasta Puttanesca
- Instant Pot Lasagna
- Oven-Baked Meatballs
- White Bean Pasta
- Kale Pasta Recipe
If you enjoyed this simple recipe for Homemade Garlic Toast, I would love for you to leave a comment and review below.
Garlic Toast

Ingredients
- 8 slices thick white bread
- 6 tablespoons unsalted butter, softened
- 1 teaspoon garlic powder
- ¼ teaspoon kosher salt
- ½ teaspoon dried oregano
Instructions
- Preheat oven to 400℉ and line a baking sheet with parchment paper.
- In a small bowl mix together 6 tablespoons unsalted butter (softened) with 1 teaspoon garlic powder, ¼ teaspoon kosher salt, and ½ teaspoon dried oregano until evenly combined.
- Spread each side of 8 slices thick white bread with the prepared garlic butter and place onto the prepared baking sheet.
- Place the baking sheet into the preheated oven and toast for 4-5 minutes. Flip the bread, and continue to bake for 3-5 minutes, or until the bread is fully golden and toasted.

Notes
Nutrition
Nutrition information is automatically calculated, so should only be used as an approximation.


Worked great and a perfect side with our spaghetti!
I love hearing that Justine!
I love garlic bread! This recipe looks so good, and so easy too! Thanks so much for linking up to Creative K Kids Tasty Tuesdays. I'm pinning this to the Tasty Tuesdays Pinterest Board. We would love to have you join us again this week!
Thanks Sydney. Tasty and easy are the way to go!!
Your Garlic Bread looks wonderful! Hope you are having a great day and thanks so much for sharing this awesome post with Full Plate Thursday.
Come Back Soon!
Miz Helen
You bet! It is always a pleasure to visit your parties!
💕💕💕 very yummy!!! Easy for this old lady and very tasty!
Looks great. I always like finding new garlic bread recipes. Pinned it. Found your blog on Full Plate Thursday and started following on Google +.
Erin
http://theeveryday-mom.blogspot.com/
Thanks Erin! I am so happy to make new blogging friends 🙂 And garlic bread---makes the nasty winters when we live on soup, so much better!
I feel like homemade bread is a lot easier than people think! And so worth it! I was gluten free for about a year and I've recently added it back in. Mmm. There is nothing gf that can compare!
Oh girl, aren't your so happy you can have your bread back?!!!
I've only attempted to make homemade bread once and failed. I think I didn't get the yeast part right! This might be worth trying again!
Alysia,
Bread use to be something I NEVER did--I seem to always fail. I guess I kept trying and eventually it has become 2nd nature to me. Don't give up! (Also, make sure you keep your yeast in the fridge and that it is fresh and use warm, but not too hot water--that kills the yeast!)
Bread. Soup. Dip. --- those are the three little words I love to hear in the Fall and Wnter!
Amen Jennifer!